Build a product sync app
Keep an external system in sync with a store's products: pull the existing catalog on install, then receive real-time changes through webhooks, fetch full product data from the Admin API, and persist it.
What this guide covers
- Subscribe to product webhooks (
products/create,products/update,products/delete) - Backfill the store's existing products on install
- Verify webhook signatures and identify the source store
- Fetch full product detail from the Admin API and persist it
When to use this
Use this when an external system (an ERP, a merchandising tool, an analytics pipeline) needs to keep a live mirror of a store's products.
How product sync works
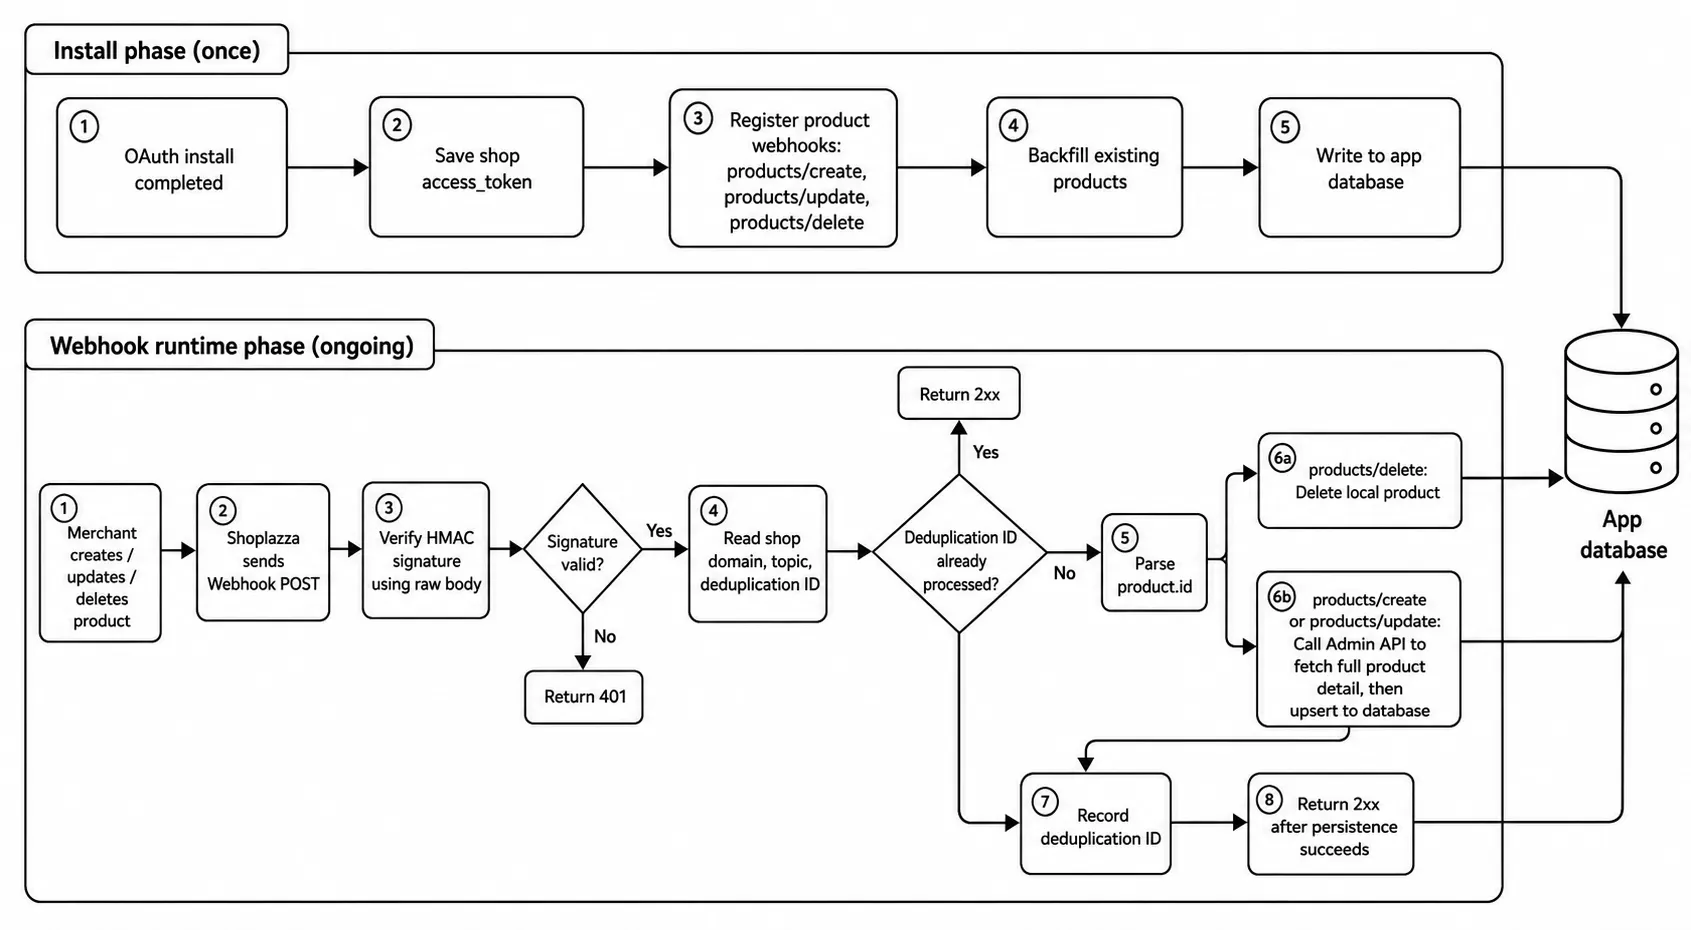
A complete sync has two phases:
- Install phase (once): after OAuth, register the product webhooks and backfill the store's existing products. Webhooks only deliver changes that happen after you subscribe, so without a backfill the products that already exist never arrive.
- Runtime phase (ongoing): every create, update, and delete is pushed to you as a webhook; you fetch the full product and persist it.
The flowchart is as follows:
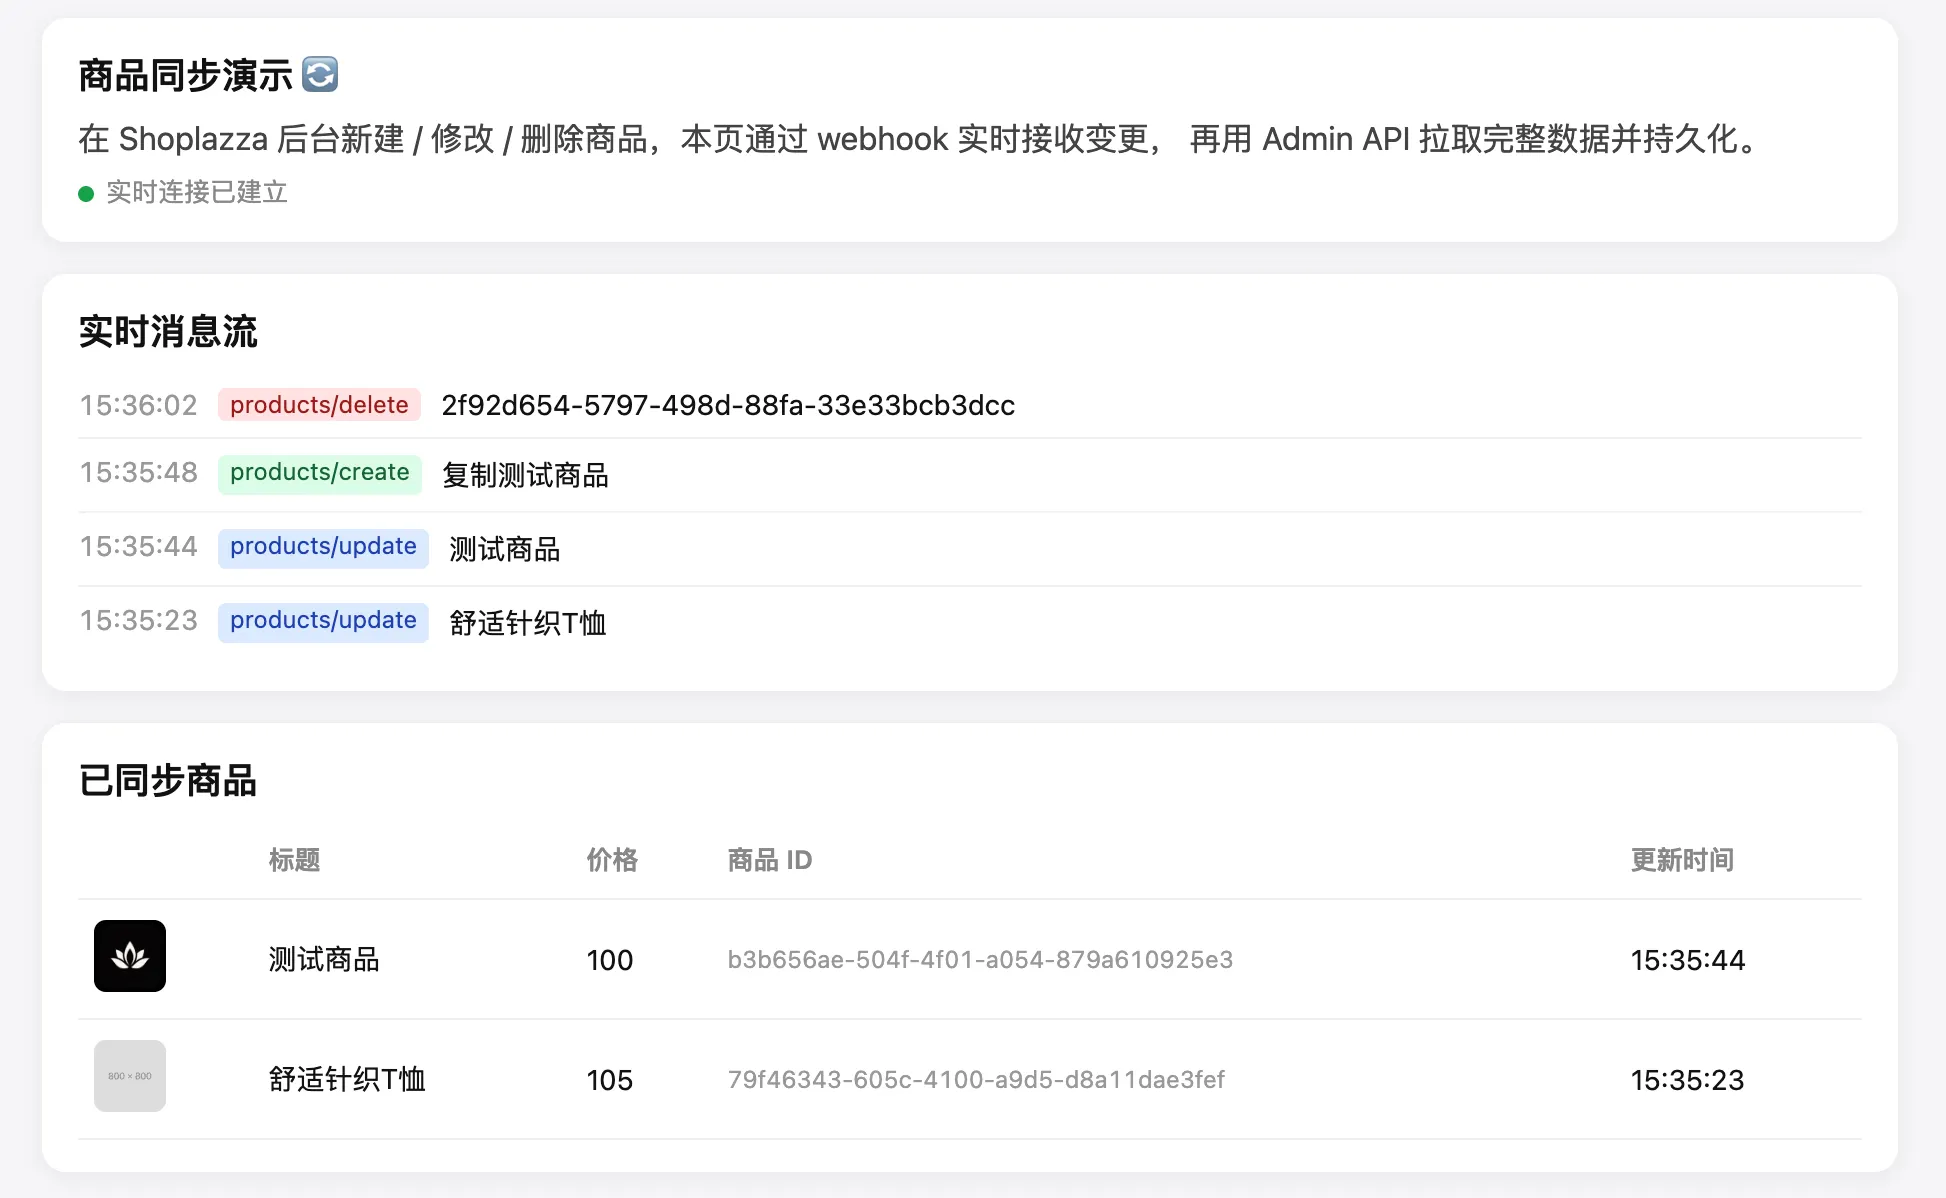
Your app persists the synced products and can display them:
This guide uses API version 2026-01 and Node.js throughout. The functions below are plain helpers; each step notes where it is called.
Prerequisites
- A working public app with OAuth and token storage — follow Develop app first. Every request below carries an
Access-Token: {token}header, using theaccess_tokenyou saved for each shop. - The
productaccess scope granted during OAuth.
Step 1: Subscribe to product webhooks
Where this runs: in your OAuth install callback, right after you save the shop's token.
Register one subscription per product event — call this once for each of products/create, products/update, and products/delete. The request body wraps the subscription in a webhook object.
POST /openapi/2026-01/webhooks
Request body:
{
  "webhook": {
    "topic": "products/create", // one call per topic
    "address": "https://your-app.example.com/webhook/products-create"
  }
}
Returns the created subscription object.
A few things to watch when registering subscriptions:
- The
addressmust be a public HTTPS URL. For local development, expose your server with a tunnel such as ngrok. - The request body differs by API version. From
2026-01(and2025-06) onward, the body must wrap the subscription in awebhookobject, as shown above. Version2022-01takes a flat{ "topic", "address" }. See Webhook Overview. - Re-registering the same topic and address creates a duplicate subscription. If you register on every install, first list existing subscriptions with
GET /openapi/2026-01/webhooksand delete the staleproducts/*ones.
Step 2: Backfill existing products
Where this runs: in the same install callback, right after registerProductWebhooks.
Pull the current catalog with the list endpoint. It uses cursor pagination — pass per_page (up to 250) and, from the second page on, the cursor returned by the previous page.
GET /openapi/2026-01/products
Response (excerpt):
{
  "code": "Success",
  "data": {
    "cursor": "MjAyNi0wMS0yM1QxMDowODoyN1o...",
    "products": [
      {
        "id": "ac7783d3-df2d-47fe-abca-7ee3d9bceb04",
        "title": "T-shirt",
        "handle": "t-shirt",
        "inventory_quantity": 666,
        "price_min": 11,
        "price_max": 33,
        "created_at": "2026-07-01T09:25:50Z"
      }
    ]
  }
}
Full fields: see List products.
To backfill, page through this endpoint: start with no cursor, hand each product in the response to your own upsertProduct (Step 5), then request the next page using the returned data.data.cursor. Stop once a page comes back empty or without a next cursor.
Step 3: Receive and verify the webhook
Where this runs: as a public HTTP route in your app — this is the entry point for every runtime change.
Verify the signature over the raw request body before trusting it, then read the source shop and event type from the request headers:
const express = require('express');
const crypto = require('crypto');
const app = express();

// Verify the webhook signature over the RAW request body.
function verifyWebhook(rawBody, hmacHeader, clientSecret) {
  const digest = crypto
    .createHmac('sha256', clientSecret)
    .update(rawBody)
    .digest('base64');
  return crypto.timingSafeEqual(Buffer.from(digest), Buffer.from(hmacHeader));
}

// One route per topic. express.raw() keeps the body as raw bytes,
// which signature verification needs — do not run a JSON parser on this route.
app.post('/webhook/:event', express.raw({ type: '*/*' }), async (req, res) => {
  const hmac = req.get('X-Shoplazza-Hmac-Sha256');
  if (!verifyWebhook(req.body, hmac, CLIENT_SECRET)) {
    return res.sendStatus(401); // reject anything that fails verification
  }

  // Identify the source shop and event from headers, not the URL or body.
  const shop = req.get('X-Shoplazza-Shop-Domain');
  const topic = req.get('X-Shoplazza-Topic');
  const dedupId = req.get('X-Shoplazza-Deduplication-ID');
  const { product } = JSON.parse(req.body.toString('utf8'));

  // Idempotency: the same event may arrive more than once — skip if already handled.
  if (await alreadyProcessed(dedupId)) {
    return res.sendStatus(200);
  }

  // ... handle the event: see Step 4 (fetch) and Step 5 (persist) ...
  res.sendStatus(200);
});
Verify against the raw, unparsed body. If a JSON body parser runs first (for example a global express.json()), the bytes change and verification always fails. Apply express.raw() on the webhook route only.
Every webhook request carries identifying headers, so you don't need to encode anything in the URL:
X-Shoplazza-Shop-Domain— which store the event came from; use it to look up that shop's tokenX-Shoplazza-Topic— the event name, such asproducts/createX-Shoplazza-Deduplication-ID— a unique event ID. Shoplazza may deliver the same event more than once, so skip IDs you have already processed.
The payload wraps the product, and only the id is guaranteed to be useful:
{ "product": { "id": "0510dace-34da-4555-a896-495e0cb1ed6e" } }
See the Products create reference for the full payload.
Step 4: Fetch full product detail
Where this runs: inside the webhook handler, for create and update events.
The webhook payload is only a snapshot. Fetch authoritative detail with the product id.
GET /openapi/2026-01/products/{id}
Returns the product under data.data.product, including options, images, variants, and primary_image. Full fields: see Get product. Step 5 calls this fetch as fetchProduct(shop, accessToken, productId).
Step 5: Persist to your datastore
Where this runs: inside the same webhook handler, replacing the placeholder in Step 3.
Look up the shop's stored token, then upsert or delete keyed by product.id, and record the event id so a redelivery is skipped. getToken, upsertProduct, deleteProduct, alreadyProcessed, and markProcessed are your own storage-layer functions (token storage comes from the prerequisites; the product table and the dedup table are yours):
const accessToken = await getToken(shop); // the token you saved for this shop at install

if (topic === 'products/delete') {
  await deleteProduct(shop, product.id); // the delete payload carries the id
} else {
  // create/update: fetch the full product, then upsert keyed by id
  const full = await fetchProduct(shop, accessToken, product.id);
  await upsertProduct(shop, product.id, full);
}

await markProcessed(dedupId); // record it so a redelivery is skipped next time
res.sendStatus(200);
alreadyProcessed and markProcessed are your own storage functions that track handled X-Shoplazza-Deduplication-IDs — Shoplazza may deliver the same event more than once. Return 2xx only after persistence succeeds; non-2xx deliveries are retried.