Develop app
This tutorial is the first step in the "Build a Shoplazza App with Shoplazza CLI" series: first scaffold a Node.js + Express.js app using the shoplazza app command and complete OAuth, then continue with the same project to add theme extensions and checkout extensions.
In this tutorial, you'll build an application that randomly generates a product by calling the Shoplazza OpenAPI.
What you'll learn
In this tutorial, you'll learn how to:
-
Quickly develop a sample Shoplazza app
-
Implement the OAuth authorization flow to obtain store access
-
Verify request security with HMAC validation
-
Call the Shoplazza OpenAPI to create a product
Prerequisites
-
An app created in Shoplazza Partners (see how to create an app)
-
A test store created in Partners
-
Node.js version ≥ 18 (Node 14 reached EOL in April 2023; use Volta / nvm to pin the version)
-
Basic knowledge of JavaScript and the Express framework
Step 1: Set up the project foundation
1.1 Create the project folder
mkdir shoplazza-app-demo
cd shoplazza-app-demo
1.2 Initialize the npm project
npm init -y
This creates a package.json file with the project's basic info.
1.3 Install dependencies
npm install express axios dotenv sqlite3
Dependency details:
-
express: Web framework for building HTTP services -
axios: HTTP client for calling the Shoplazza OpenAPI -
dotenv: Environment variable manager -
sqlite3: Lightweight database for storing access tokens
cryptois a built-in Node.js module (used for HMAC validation). Do not install it via npm. Thecryptopackage on npm is deprecated/unrelated and poses a typosquatting supply chain risk.
1.4 Create a basic Express server
Create index.js in the project root:
const express = require("express");
const app = express();

app.get("/", (req, res) => {
  res.send("Shoplazza App is running!");
});

app.listen(3000, () => {
  console.log("Server is listening on port 3000");
});
1.5 Start the server
node index.js
Visit http://localhost:3000. You should see "Shoplazza App is running!".
Step 2: Configure ngrok for tunneling
Since Shoplazza needs to access your app via a public URL, use ngrok to expose your local service.
2.1 Download and install ngrok
Visit the ngrok website to download the version for your system.
macOS users can install via Homebrew:
brew install ngrok/ngrok/ngrok
Or download the binary directly:
-
Download the version for your system
-
Extract it and move the ngrok binary into your system PATH
2.2 Sign up and get your authtoken
-
Go to https://dashboard.ngrok.com/signup to create an account
-
After logging in, go to https://dashboard.ngrok.com/get-started/your-authtoken
-
Copy your authtoken
-
Run this command in your terminal:
ngrok config add-authtoken YOUR_AUTHTOKEN
2.3 Start ngrok
Make sure your Express server is running (port 3000), then in a new terminal window, run:
ngrok http 3000
You'll see output similar to:
Session Status                online
Account                       [email protected]
Version                       3.x.x
Region                        United States (us)
Forwarding                    https://xxx.ngrok-free.dev -> http://localhost:3000
Visit https://xxx.ngrok-free.dev. You should see "Shoplazza App is running!".
Step 3: Configure environment variables
3.1 Create the .env file
Projects often provide a
.env.exampletemplate; you can simply runcp .env.example .envand fill in the actual values.
Create .env in the project root:
CLIENT_ID=your_client_id_here
CLIENT_SECRET=your_client_secret_here
BASE_URL=https://xxx.ngrok-free.dev
SCOPES=write_product
SCOPES defines the permission scopes your app requests. Separate multiple scopes with spaces (e.g., write_product read_order). See the full list in the Shoplazza API permission documentation.
3.2 Get CLIENT_ID and CLIENT_SECRET
-
Log in to Shoplazza Partners
-
Go to the detail page of the app you created
-
In the "App credentials" section, find: Client ID, Client Secret
-
Copy these values into your
.envfile
3.3 Set BASE_URL
Fill in the HTTPS URL generated by ngrok in Step 2.
BASE_URL=https://xxx.ngrok-free.dev
3.4 Set the app callback URLs
In your Shoplazza Partners app settings, set these two URLs:
-
App URLto:https://xxx.ngrok-free.dev/auth -
Redirect URLto:https://xxx.ngrok-free.dev/auth/callback
3.5 Create the .gitignore file
To protect sensitive information, create .gitignore:
# Dependencies
node_modules/

# Logs
logs
*.log
npm-debug.log*
yarn-debug.log*
yarn-error.log*

# OS files
.DS_Store
Thumbs.db

# IDE
.vscode/
.idea/
*.swp
*.swo
*~

# Build outputs
dist/
build/

.env
.env.*
*.db
Security note:
-
Never commit the
.envfile to your repository -
For production, use a secrets manager like AWS Secrets Manager, Azure Key Vault, etc.
Step 4: Implement the OAuth authorization flow
This step implements the OAuth 2.0 authorization code flow. For complete flow principles, HMAC algorithm, security considerations, and best practices, see the App Authorization Reference.
4.1 Create utility functions and HMAC validation
Before implementing the specific auth routes, prepare some utility functions.
These include: an environment variable check middleware, an HMAC validation middleware, etc. HMAC validation is a critical security measure in the OAuth flow, ensuring that requests truly come from the Shoplazza platform and are not forged or tampered with by malicious third parties.
Create utils/index.js:
require("dotenv").config();
const crypto = require("crypto");

const CLIENT_ID = process.env.CLIENT_ID;
const CLIENT_SECRET = process.env.CLIENT_SECRET;
const BASE_URL = process.env.BASE_URL;
const SCOPES = process.env.SCOPES;
const REDIRECT_URI = `${BASE_URL}/auth/callback`;

// Validate shop domain (prevents SSRF): allow *.myshoplaza.com / *.dev.myshoplaza.com / *.stg.myshoplaza.com
const SHOP_DOMAIN_REGEXP = /^[a-z0-9][a-z0-9-]*(\.dev|\.stg)?\.myshoplaza\.com$/i;
function isValidShop(shop) {
  return typeof shop === "string" && SHOP_DOMAIN_REGEXP.test(shop);
}

// Check required environment variables
function checkEnvMiddleware(req, res, next) {
  if (!CLIENT_ID || !CLIENT_SECRET || !BASE_URL) {
    const missingVars = [];
    if (!CLIENT_ID) missingVars.push("CLIENT_ID");
    if (!CLIENT_SECRET) missingVars.push("CLIENT_SECRET");
    if (!BASE_URL) missingVars.push("BASE_URL");

    return res.status(500).send(`Missing environment variables: ${missingVars.join(", ")}`);
  }
  next();
}

// Secure comparison function (prevents timing attacks)
function secureCompare(a, b) {
  try {
    const A = Buffer.from(a, "hex");
    const B = Buffer.from(b, "hex");
    if (A.length !== B.length) return false;
    return crypto.timingSafeEqual(A, B);
  } catch (e) {
    return false;
  }
}

// HMAC verification middleware
function hmacValidator(req, res, next) {
  const { hmac } = req.query;
  const map = Object.assign({}, req.query);
  delete map["hmac"]; // Remove the hmac parameter

  // Sort parameters alphabetically
  const sortedKeys = Object.keys(map).sort();
  const message = sortedKeys.map((key) => `${key}=${map[key]}`).join("&");

  // Generate HMAC using CLIENT_SECRET
  const generated_hash = crypto
    .createHmac("sha256", CLIENT_SECRET)
    .update(message)
    .digest("hex");

  if (!secureCompare(generated_hash, hmac)) {
    return res.status(400).send("HMAC validation failed");
  }
  next();
}

// Simple state temporary storage (for demo; use Redis/session in production)
const stateStore = new Map();
const STATE_TTL_MS = 10 * 60 * 1000; // 10 minutes
function saveState(state, shop) {
  stateStore.set(state, { shop, expireAt: Date.now() + STATE_TTL_MS });
}
function consumeState(state, shop) {
  const entry = stateStore.get(state);
  if (!entry) return false;
  stateStore.delete(state); // One-time use
  if (entry.expireAt < Date.now()) return false;
  return entry.shop === shop;
}

module.exports = {
  checkEnvMiddleware,
  hmacValidator,
  isValidShop,
  saveState,
  consumeState,
  CLIENT_ID,
  CLIENT_SECRET,
  BASE_URL,
  SCOPES,
  REDIRECT_URI,
};
Code Explanation:
checkEnvMiddleware: Middleware function that ensures all required environment variables are configured.secureCompare: Time-safe comparison to prevent timing attacks.hmacValidator: HMAC verification middleware that ensures the request originates from Shoplazza.isValidShop: Validates that theshopparameter is a legitimate*.myshoplaza.comdomain, preventing SSRF attacks — attackers could passevil.comto make the server send token exchange requests to a third-party domain.saveState/consumeState: OAuthstatetemporary storage; write on authorization initiation, one-time consume and validate on callback, preventing CSRF attacks.REDIRECT_URI: Automatically concatenates the authorization callback URL.
For HMAC verification algorithm and why HMAC is needed, see App Authorization Reference.
4.2 Implement the Authorization Entry Route
Now let's implement the first step of the authorization flow: constructing the authorization page URL and redirecting the user.
When a user clicks to install the app, the app must redirect the user to Shoplazza's authorization page, including parameters such as the app ID, required scopes, and callback URL in the URL.
Add the /auth route in the project root index.js:
const crypto = require("crypto");
const {
  checkEnvMiddleware,
  hmacValidator,
  isValidShop,
  saveState,
  CLIENT_ID,
  SCOPES,
  REDIRECT_URI,
} = require("./utils/index");

app.get("/auth", checkEnvMiddleware, hmacValidator, (req, res) => {
  const { shop } = req.query;

  // Validate that shop is a legitimate *.myshoplaza.com domain (prevents SSRF)
  if (!isValidShop(shop)) {
    return res.status(400).send("Invalid shop domain");
  }

  const state = crypto.randomBytes(16).toString("hex"); // Random value to prevent CSRF
  saveState(state, shop); // Store state for callback validation

  // URL-encode parameters
  const scopesEncoded = encodeURIComponent(SCOPES);
  const redirectUriEncoded = encodeURIComponent(REDIRECT_URI);

  // Redirect user to Shoplazza authorization page
  res.redirect(
    `https://${shop}/admin/oauth/authorize?client_id=${CLIENT_ID}&scope=${scopesEncoded}&redirect_uri=${redirectUriEncoded}&response_type=code&state=${state}`
  );
});
Parameter Description:
shop: Shop domain (e.g.,example.myshoplaza.com), obtained from query parameters; must be validated as a legitimate*.myshoplaza.comdomain.client_id: The app's client ID.scope: Requested permission scopes, read from environment variableSCOPES; multiple scopes are separated by spaces (e.g.,write_product read_order).redirect_uri: Callback URL after authorization completes.response_type: Fixed valuecode, indicating authorization code mode.state: Random string to prevent CSRF attacks; must be stored in/authand validated in/auth/callback(reject if inconsistent).
For more permission scopes, see the Shoplazza API Permissions Documentation.
4.3 Implement the Authorization Callback Route
After the user clicks "Approve" on the Shoplazza authorization page, Shoplazza redirects the user back to your app with an authorization code (code) in the URL.
You need to implement the callback route to receive this authorization code and then exchange it for an access token. The obtained access_token must be stored securely, as it is required for all subsequent API calls to authenticate.
Add the /auth/callback route in index.js:
Token interface request parameters:
client_id: The client ID of the appclient_secret: The client secret of the appcode: The authorization codegrant_type: Fixed valueauthorization_coderedirect_uri: Must match the callback URL used during authorization
Token interface response:
{
  "token_type": "Bearer",
  "expires_at": 1550546245,
  "access_token": "{YOUR_ACCESS_TOKEN}",
  "refresh_token": "{YOUR_REFRESH_TOKEN}",
  "store_id": "2",
  "store_name": "xxx"
}
4.4 Implementing token storage
After obtaining the access_token, you need to persist it.
In the sample project, we use an SQLite database to store each store's access token, with the store domain as the primary key (in production, consider PostgreSQL, MySQL, etc.). This way, when a store revisits the app, you can read the token directly from the database without re-authorization.
Create the utils/sqlite.js file:
const path = require("path");
const sqlite3 = require("sqlite3").verbose();

const DB_PATH = path.resolve(__dirname, "../database/tokens.db");
const db = new sqlite3.Database(DB_PATH);

// 初始化数据库表
const initPromise = new Promise((resolve, reject) => {
  db.run(
    `CREATE TABLE IF NOT EXISTS shop_tokens (
      shop_domain TEXT PRIMARY KEY,
      access_token TEXT NOT NULL,
      updated_time INTEGER NOT NULL
    )`,
    (err) => {
      if (err) return reject(err);
      resolve();
    }
  );
});

// 保存或更新 token
function saveToken(shopDomain, accessToken) {
  return initPromise.then(
    () =>
      new Promise((resolve, reject) => {
        const now = Date.now();
        // UPSERT:shop_domain 已存在则更新 token 与时间,否则插入新行(excluded 指本次待插入的值)
        db.run(
          `INSERT INTO shop_tokens (shop_domain, access_token, updated_time)
           VALUES (?, ?, ?)
           ON CONFLICT(shop_domain) DO UPDATE SET
             access_token = excluded.access_token,
             updated_time = excluded.updated_time`,
          [shopDomain, accessToken, now],
          (err) => {
            if (err) return reject(err);
            resolve();
          }
        );
      })
  );
}

// 获取 token
function getShopToken(shopDomain) {
  return initPromise.then(
    () =>
      new Promise((resolve, reject) => {
        db.get(
          `SELECT access_token FROM shop_tokens WHERE shop_domain = ?`,
          [shopDomain],
          (err, row) => {
            if (err) return reject(err);
            resolve(row?.access_token || null);
          }
        );
      })
  );
}

module.exports = {
  saveToken,
  getShopToken,
};
Database design notes:
-
shop_domain: Store domain (primary key) -
access_token: Access token -
updated_time: Update timestamp
Also, create the database folder:
mkdir database
When the app starts, the tokens.db file is automatically created to store each store's access_token.
Production considerations:
- Do not use
require("sqlite3").verbose(), asverboseoutputs extra debug logs that affect performance and readability. Userequire("sqlite3")in production.- Configure the database path via an environment variable (e.g.,
DB_PATH) to avoid issues with relative paths in different deployment environments.- SQLite is suitable for demonstration only. For formal projects, use standalone databases like PostgreSQL or MySQL.
Step 5: Create the app homepage
5.1 Implement the homepage route
The app homepage is the first page users see after authorization. This page calls a backend endpoint to create a random product. The backend endpoint first checks whether the store has been authorized (i.e., whether an access_token exists in the database for the store). If not authorized, it redirects to the authorization flow; if authorized, it calls the Shoplazza OpenAPI to create a random product.
In the project root's index.js, modify the original homepage route:
const path = require("path");
const { getShopToken } = require("./utils/sqlite");
const { isValidShop } = require("./utils/index");

app.get("/", checkEnvMiddleware, async (req, res) => {
  const { shop } = req.query;

  if (!shop || !isValidShop(shop)) {
    return res.send("请提供合法的 shop 参数。");
  }

  // 检查是否已授权
  const token = await getShopToken(shop);
  if (!token) {
    return res.redirect(`/auth?shop=${shop}`);
  }

  // 返回应用首页(用 sendFile 避免每次请求都同步读文件)
  res.sendFile(path.resolve(__dirname, "index.html"));
});
Using
res.sendFileinstead offs.readFileSync+res.sendavoids synchronous disk reads on every request. If the homepage is purely static, you can also useapp.use(express.static(__dirname))to let Express serve it.
Logic explanation:
-
Retrieve the
shopparameter from the query string. -
Query the database to check if the store is already authorized.
-
If not authorized, redirect to
/authto start the authorization flow. -
If authorized, return the app homepage HTML.
5.2 Create the HTML page
Now, let's create the app's frontend interface.
This page contains a simple button that, when clicked, calls the backend endpoint to create a random product. It is built with plain HTML and JavaScript, communicates with the backend via the fetch API, and displays the result in real time.
In the project root, create the index.html file:
<!DOCTYPE html>
<html lang="en">
<head>
  <meta charset="UTF-8">
  <meta name="viewport" content="width=device-width, initial-scale=1.0">
  <title>Shoplazza App Demo</title>
  <style>
    * { box-sizing: border-box; }
    body {
      margin: 0;
      font-family: -apple-system, BlinkMacSystemFont, "Segoe UI", sans-serif;
      background: #f5f5f7;
      color: #111;
    }
    .page {
      max-width: 860px;
      margin: 24px auto;
      padding: 0 16px;
      display: flex;
      flex-direction: column;
      gap: 16px;
    }
    .card {
      background: #fff;
      border-radius: 12px;
      padding: 16px 18px;
      box-shadow: 0 2px 10px rgba(0,0,0,0.06);
    }
    .card h2 { margin: 0 0 8px; font-size: 18px; }
    .card p { margin: 6px 0; color: #444; }
    .card pre {
      background: #f8f8fb;
      padding: 12px;
      border-radius: 8px;
      overflow: auto;
    }
    .btn {
      border: none;
      background: #111;
      color: #fff;
      padding: 10px 14px;
      border-radius: 8px;
      cursor: pointer;
    }
    .btn:disabled { opacity: 0.6; cursor: not-allowed; }
    .result { margin-top: 12px; color: #333; font-size: 14px; }
  </style>
</head>
<body>
  <div class="page">
    <div class="card">
      <h2>Congratulations on Creating Your Shoplazza App 🎉</h2>
      <p>This is a simplified demo page. The tech stack is as follows:</p>
      <ul>
        <li>Framework: Express</li>
        <li>UI: Simple HTML</li>
        <li>API: <a href="https://www.shoplazza.dev/reference/api-usage" target="_blank">Shoplazza OpenAPI</a></li>
        <li>Database: SQLite</li>
      </ul>
    </div>

    <div class="card">
      <h2>Create a Product</h2>
      <p>Click the button to create a random product.</p>
      <button class="btn" id="createBtn">Generate Product</button>
      <div class="result" id="createResult"></div>
      <pre id="productResult" style="display: none;"></pre>
    </div>
  </div>

  <script>
    function getShop() {
      const params = new URLSearchParams(window.location.search);
      return params.get("shop");
    }

    const shop = getShop();
    const btn = document.getElementById("createBtn");
    const result = document.getElementById("createResult");
    const productResult = document.getElementById("productResult");

    btn.addEventListener("click", async () => {
      if (!shop) {
        result.textContent = "Please provide a shop parameter.";
        return;
      }

      btn.disabled = true;
      result.textContent = "Creating...";
      productResult.textContent = "";

      try {
        const resp = await fetch(`/api/create-product?shop=${encodeURIComponent(shop)}`, {
          method: "POST",
        });
        const data = await resp.json();

        if (!data.ok) {
          result.textContent = "Creation failed: " + JSON.stringify(data.error);
        } else {
          const product = data.product || {};
          result.textContent = "Creation succeeded: " + (product.title || product.id || "OK");
          productResult.textContent = JSON.stringify(product, null, 2);
          productResult.style.display = "block";
        }
      } catch (e) {
        result.textContent = "Creation failed: " + e.message;
        productResult.style.display = "none";
      } finally {
        btn.disabled = false;
      }
    });
  </script>
</body>
</html>
Page Features:
- Display basic app information
- Provide a "Generate Product" button
- Call the
/api/create-productendpoint when the button is clicked - Show the creation result and product details
Step 6: Use OpenAPI to Create a Product
6.1 Create a Random Product Data Generation Function
To demonstrate the product creation feature, we need a function that can generate random product data. This function will randomly combine product titles, generate random prices, and construct a data structure that conforms to the Shoplazza OpenAPI requirements.
Add the following to utils/index.js:
function randomPick(list) {
  return list[Math.floor(Math.random() * list.length)];
}

function randomInt(min, max) {
  return Math.floor(Math.random() * (max - min + 1)) + min;
}

function buildRandomProductPayload() {
  const prefix = ["春日", "轻盈", "舒适", "简约", "清新", "自然", "柔软"];
  const material = ["棉麻", "纯棉", "雪纺", "牛仔", "针织", "丝滑"];
  const category = ["T恤", "衬衫", "连衣裙", "外套", "卫衣", "长裤"];
  const suffix = ["款", "风", "系列", "限定", "基础款"];

  const title = `${randomPick(prefix)}${randomPick(material)}${randomPick(category)}${randomPick(suffix)}`;
  const price = parseFloat((randomInt(79, 299) + randomInt(0, 99) / 100).toFixed(2));

  return {
    title,
    images: [
      {
        src: "https://placehold.co/800x800",
      },
    ],
    variants: [
      {
        price,
        position: 1,
      },
    ],
  };
}

module.exports = {
  // ... 其他导出
  buildRandomProductPayload,
};
Data Structure Description:
title: Product title (randomly combined)images: Array of product imagessrc: Image URL
variants: Array of product variantsprice: Priceposition: Variant sort position
6.2 Implement the Product Creation Endpoint
Now we implement the core functionality: call the Shoplazza OpenAPI to create a product. This endpoint will retrieve the store's access_token from the database, generate random product data, and then call Shoplazza's product creation API. The endpoint needs to handle various possible error scenarios and return user-friendly error messages.
Add the /api/create-product route in index.js:
const { buildRandomProductPayload, isValidShop } = require("./utils/index");

app.post("/api/create-product", checkEnvMiddleware, async (req, res) => {
  const { shop } = req.query;

  if (!shop || !isValidShop(shop)) {
    return res.status(400).json({ ok: false, error: "Please provide a valid shop parameter." });
  }

  const token = await getShopToken(shop);

  if (!token) {
    return res.status(401).json({ ok: false, error: "Unauthorized, please complete the installation first." });
  }

  try {
    const payload = buildRandomProductPayload();

    const { data } = await axios.post(
      `https://${shop}/openapi/2025-06/products`,
      { product: payload },
      {
        headers: {
          "Access-Token": token,
        },
      }
    );

    res.json({ ok: true, product: data?.product || data });
  } catch (err) {
    const status = err.response?.status || 500;
    const detail = err.response?.data || err.message || "Creation failed";

    res.status(status).json({ ok: false, error: detail });
  }
});
Creating a product is a write operation, so you should use
app.post(...)(the front-endfetchalso needs to includemethod: "POST").app.getrepresents read-only in RESTful semantics, and some browsers/proxies may cache GET requests or resend them on redirect.
OpenAPI Endpoint Description:
For detailed parameter descriptions, request format, response structure, and more about the Shoplazza OpenAPI, refer to the Shoplazza Product API Documentation.
6.3 Add Global Error Handling Middleware
To prevent unhandled exceptions in asynchronous routes from crashing the process, add an error-handling middleware after all route registrations in index.js:
// Note: Error-handling middleware must have 4 parameters (err, req, res, next) and be placed after all routes
app.use((err, req, res, next) => {
  console.error("Unhandled error:", err);
  if (res.headersSent) return next(err);
  res.status(500).json({ ok: false, error: "Internal server error" });
});
If there are asynchronous codes that bypass Express routes (e.g., global event callbacks), it is recommended to also listen to process.on("unhandledRejection", ...) and process.on("uncaughtException", ...) as process-level fallbacks.
Step 7: Test the App
7.1 Start the App
Ensure the following services are running:
Terminal 1 - Express service:
node index.js
Terminal 2 - ngrok service:
ngrok http 3000
7.2 Install the App to a Test Store
-
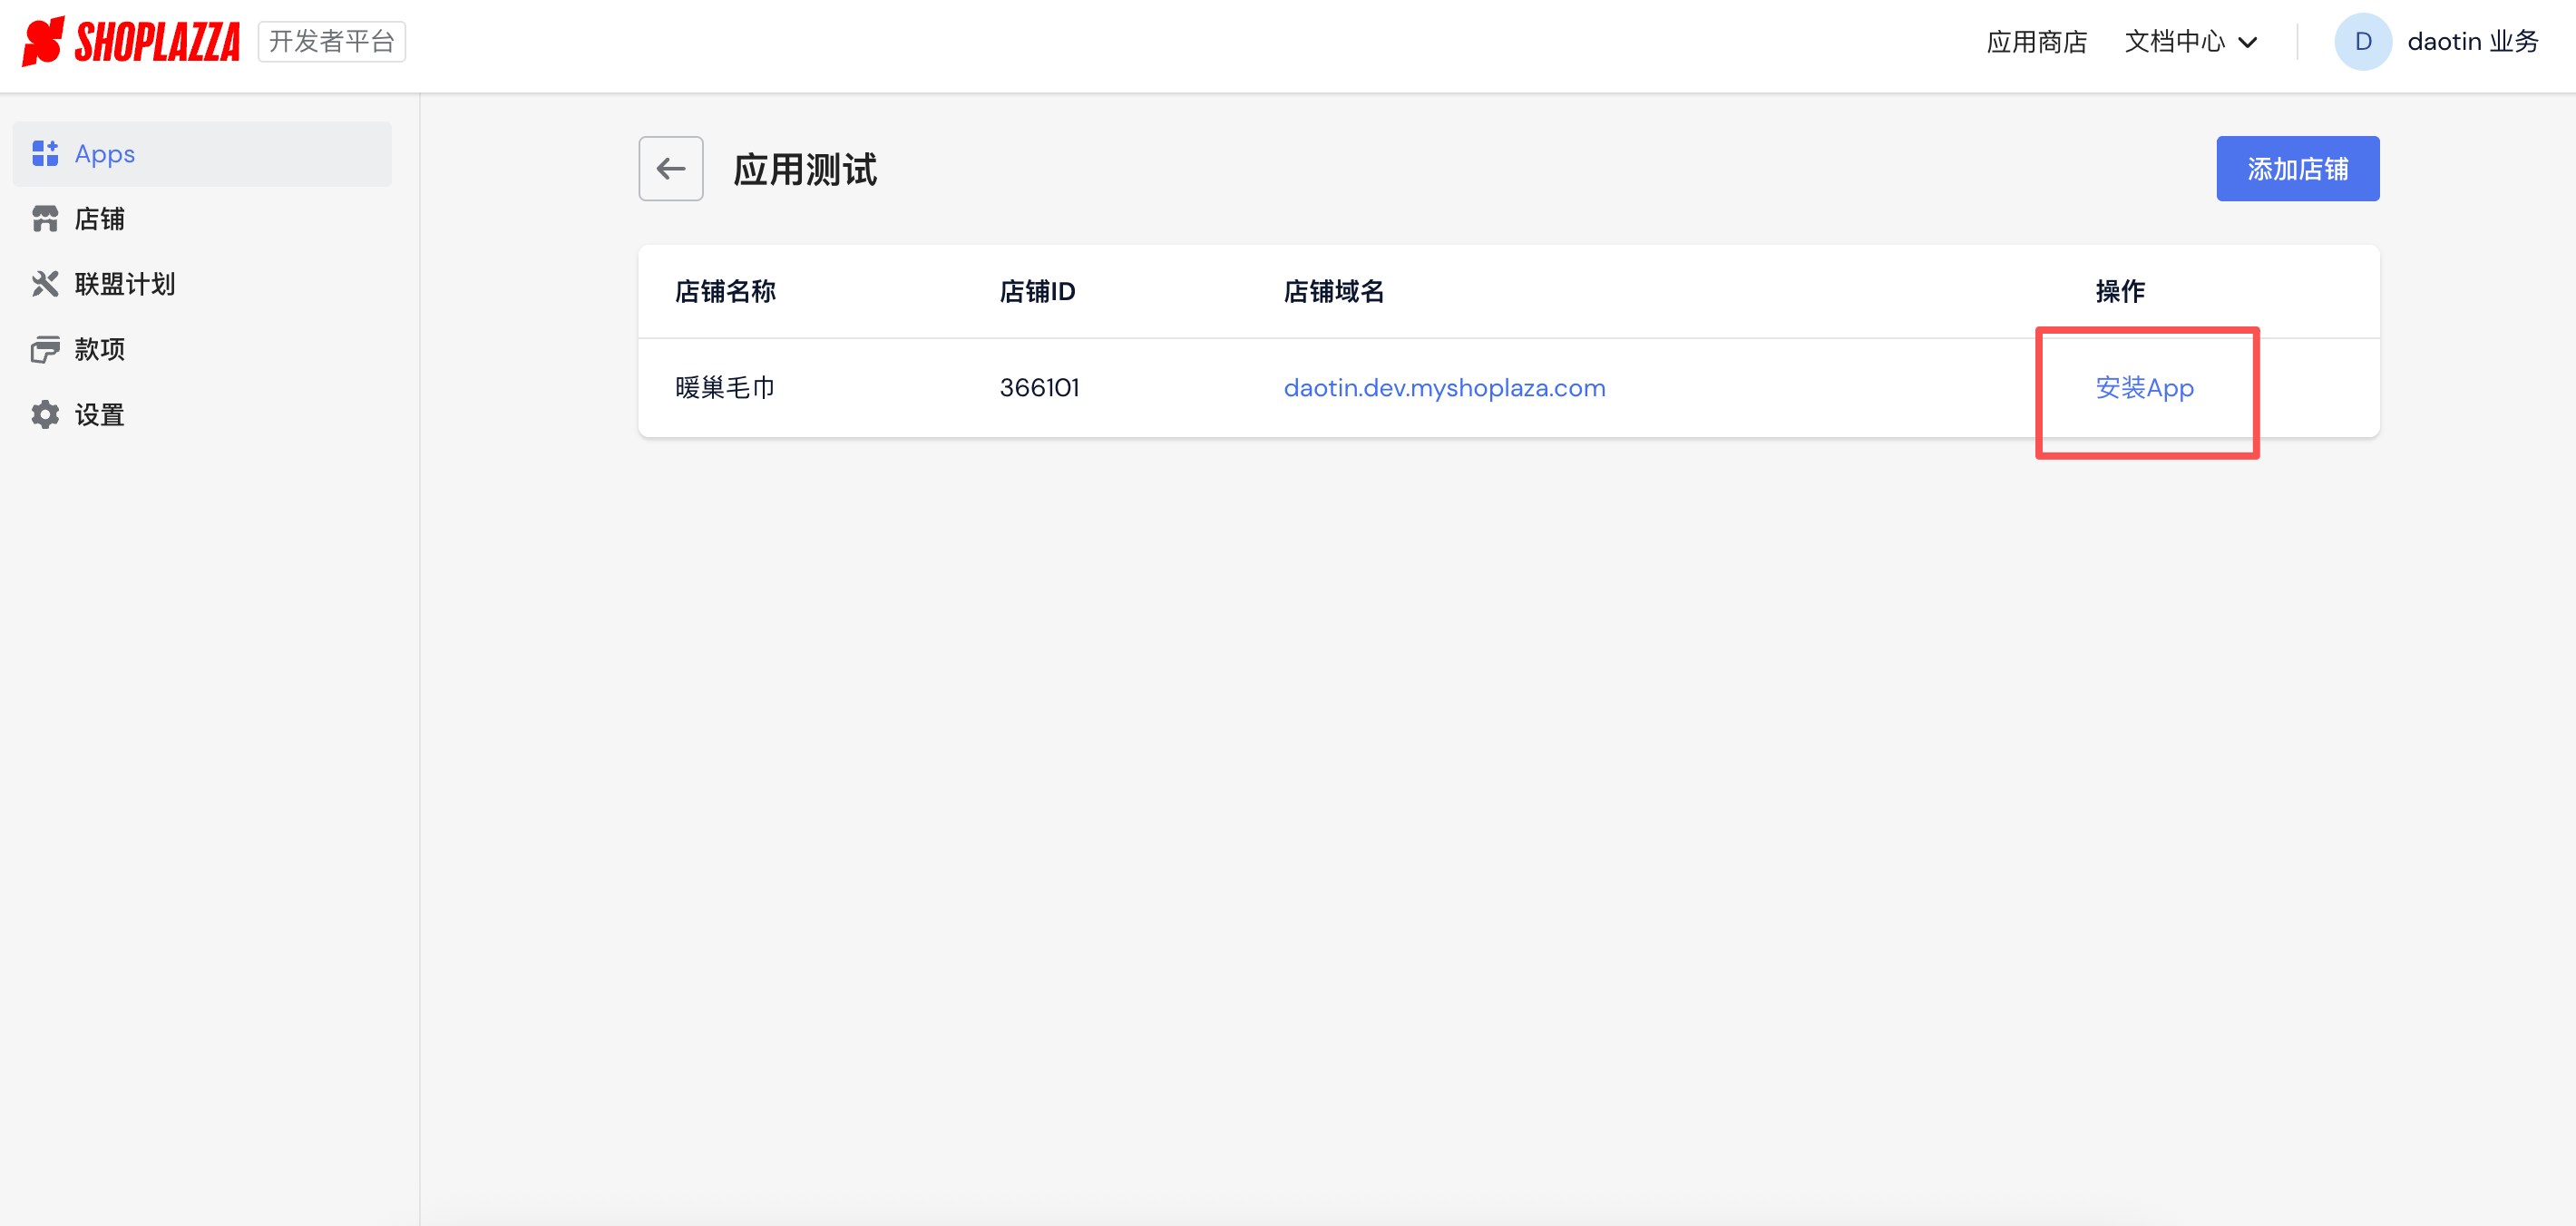
Install the test app through the Partners dashboard: Log in to Shoplazza Partners, click "App Detail Page → App Testing → Select Store → Install App"
-
You will be redirected to the Shoplazza authorization page
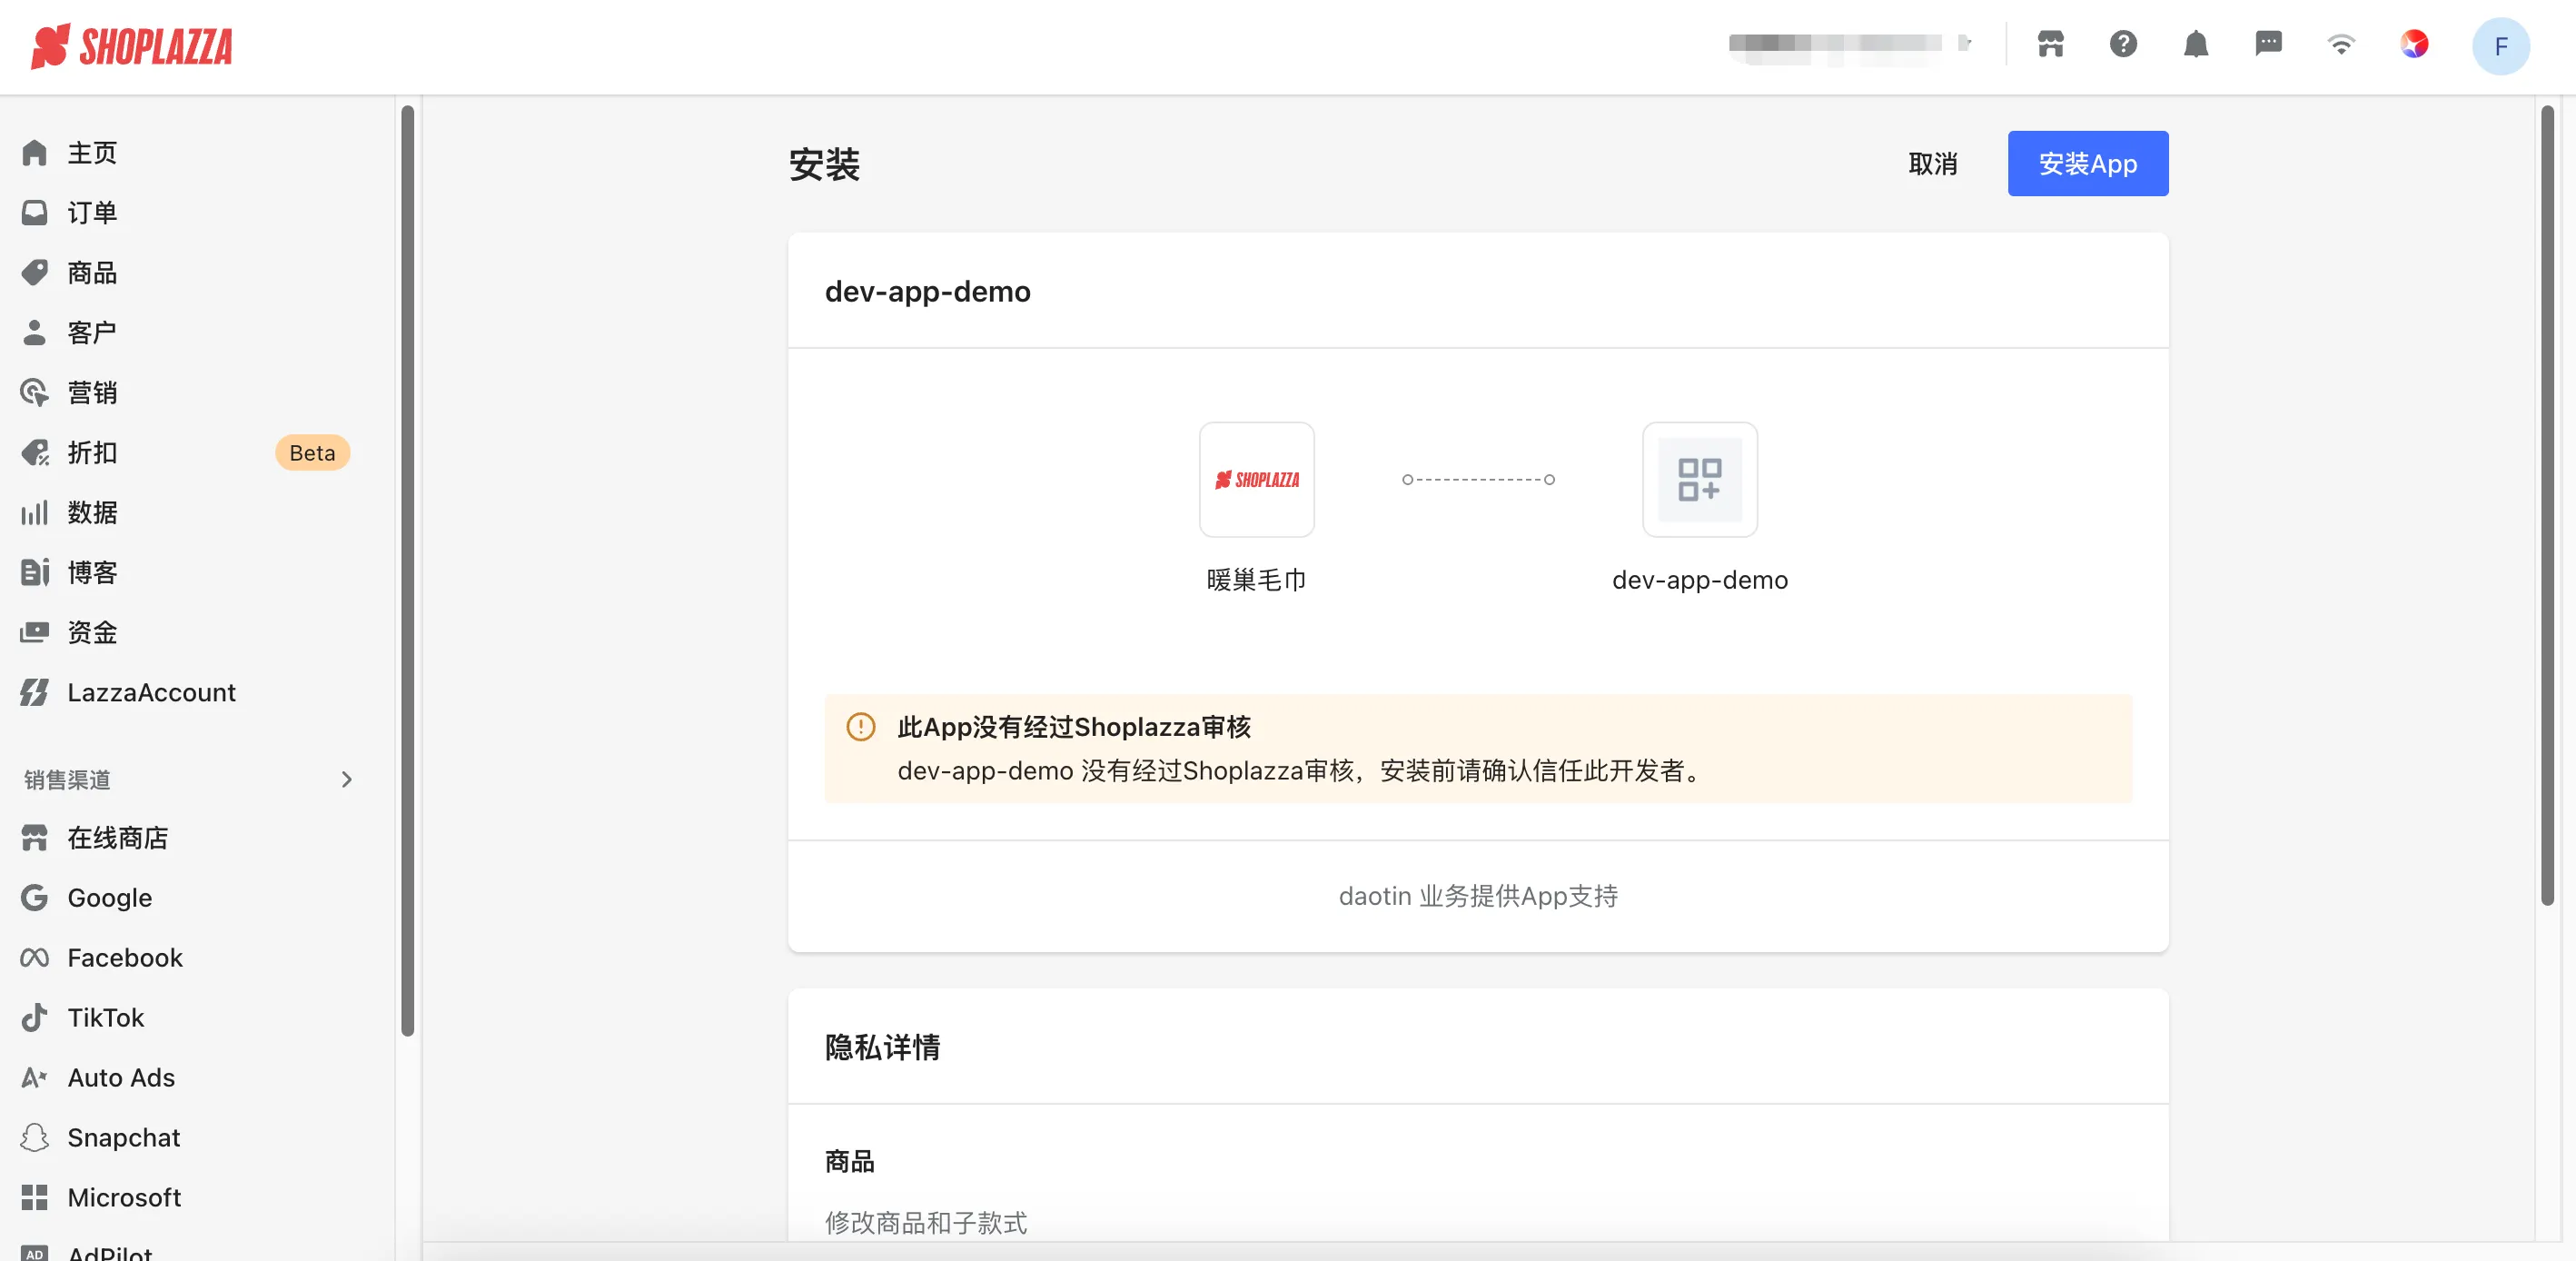
-
Click the "Install App" button
-
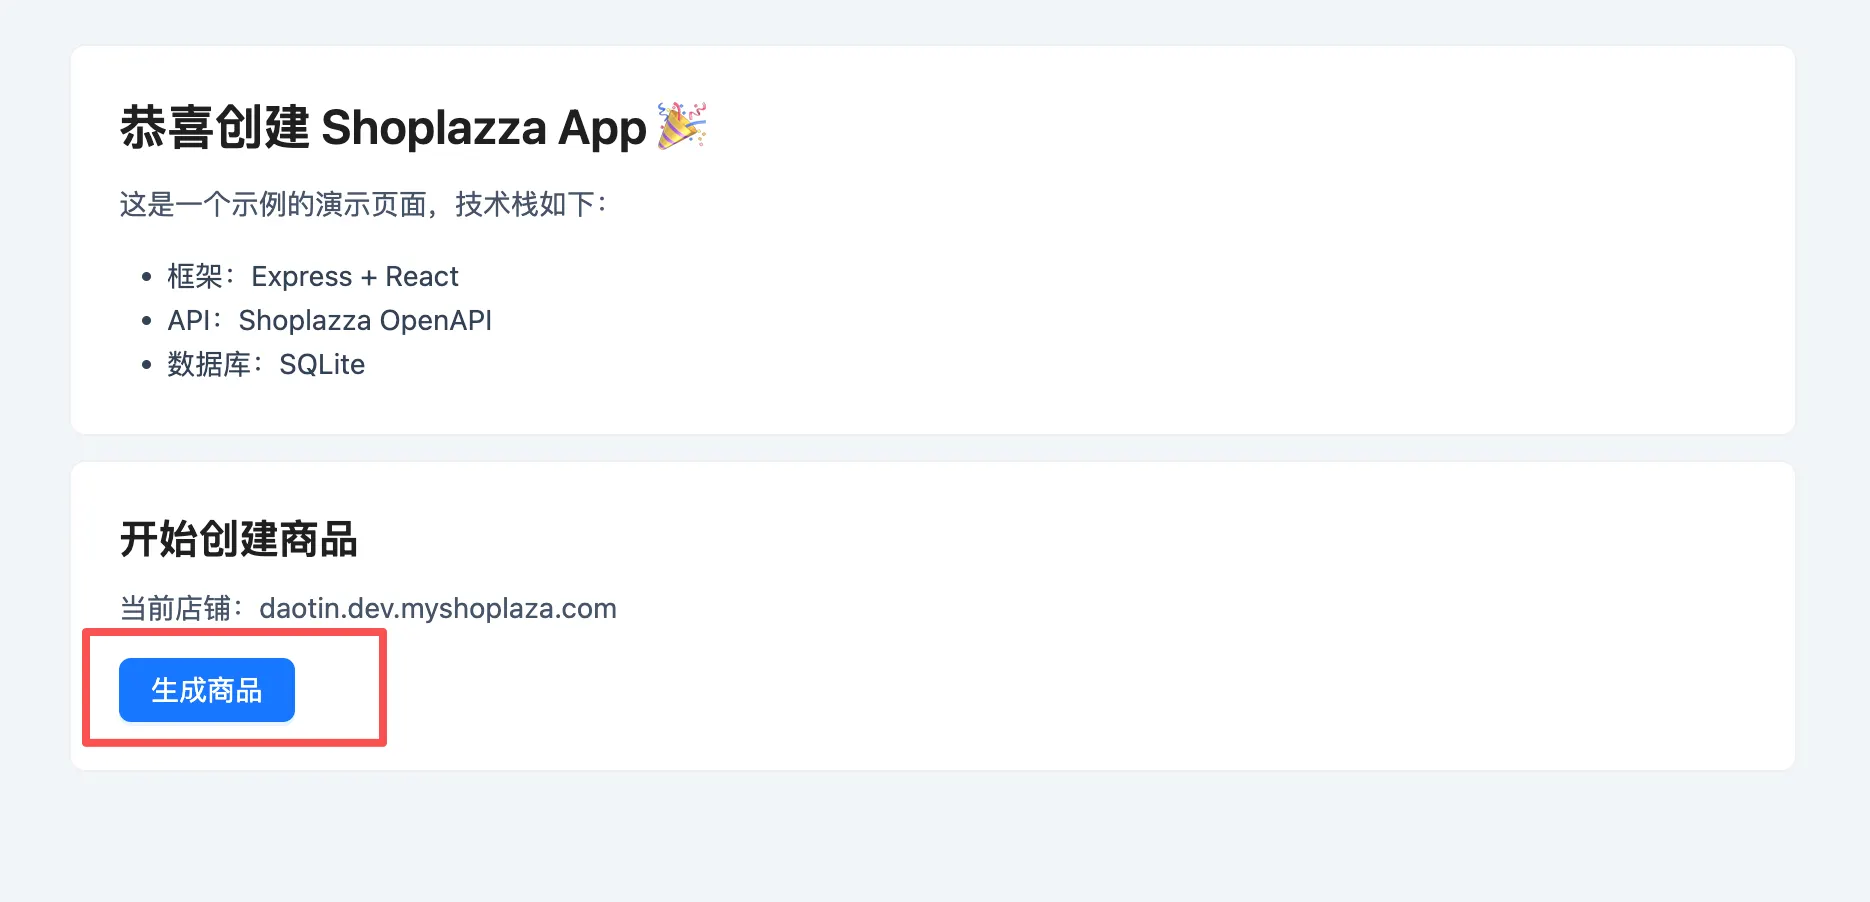
After successful authorization, you will be redirected to the app's home page
7.3 Create a Product
-
On the app's home page, click the "Generate Product" button
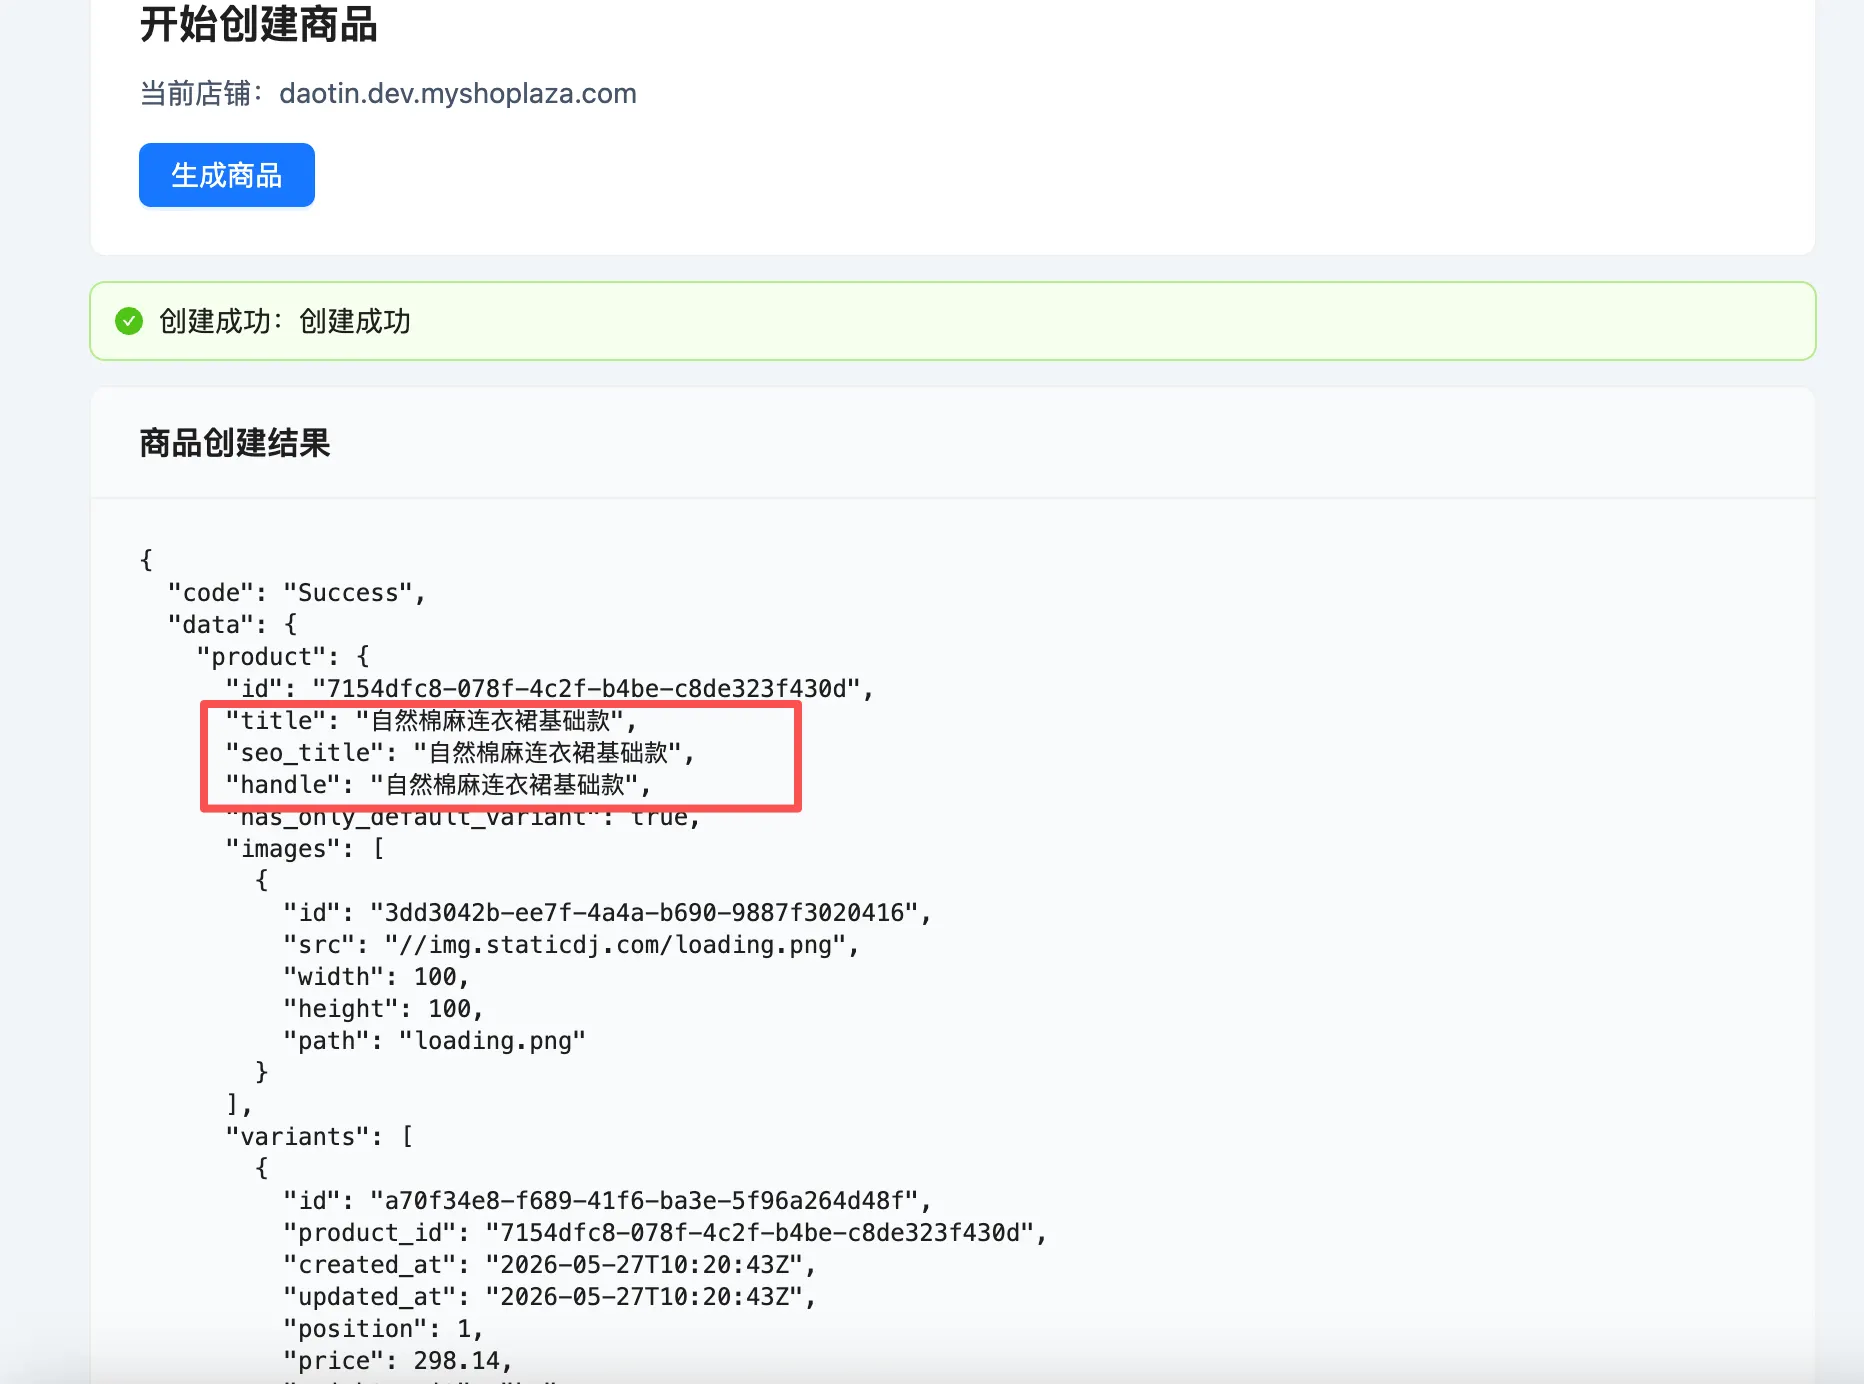
-
After a few seconds, you will see a success message along with product details
-
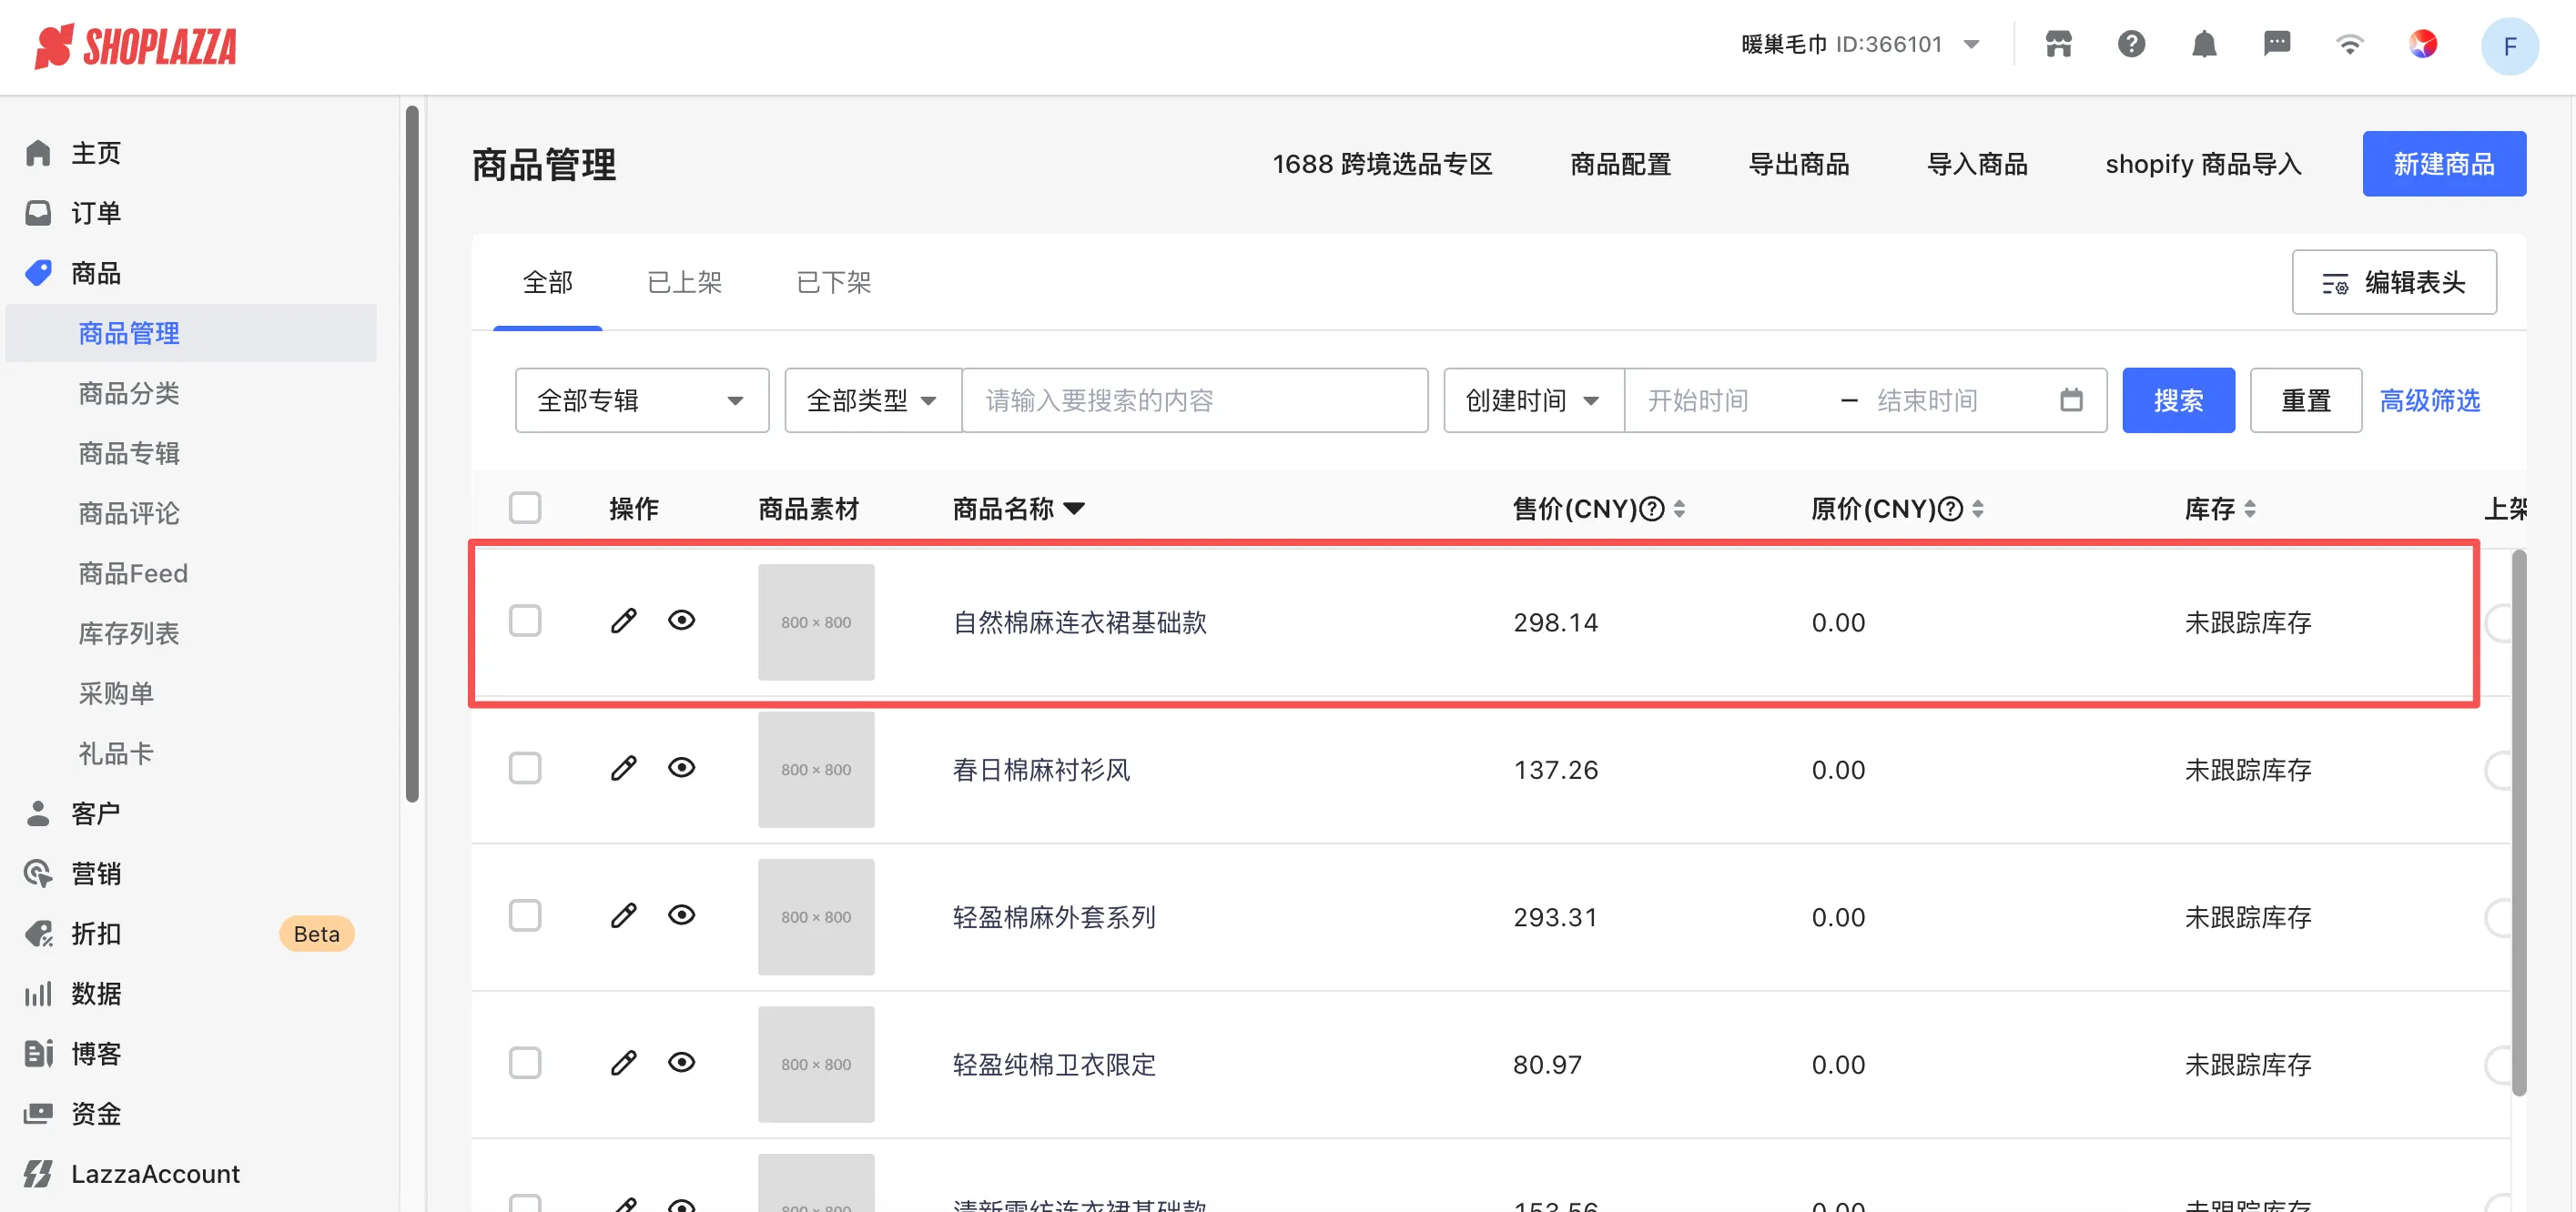
Log in to the Shoplazza store admin, go to the "Products" page to view the newly created product
Next Steps
Congratulations! You have successfully created a Shoplazza App using Node.js, Express.js, and SQLite. You can now:
- Publish the app: Submit your app to the App Store. See Shoplazza App Submission
- Build an embedded app: Run your app inside the store admin with App Bridge + Session Token. See Build an embedded app with Node.js and Express.js
- Theme Extension development: Develop Theme Extensions. See Shoplazza App Theme Extension Development
- Checkout Extension development: Develop Checkout Extensions. See Shoplazza App Checkout Extension Development
- Deep dive into authorization and best practices: See App Authorization Reference