按照上述流程填写相关信息后,在进行测试和提交审核之前,您需要开发应用服务。应用服务通过一系列 API 与 Shoplazza 进行交互。
获取 Shoplazza API 授权
概述
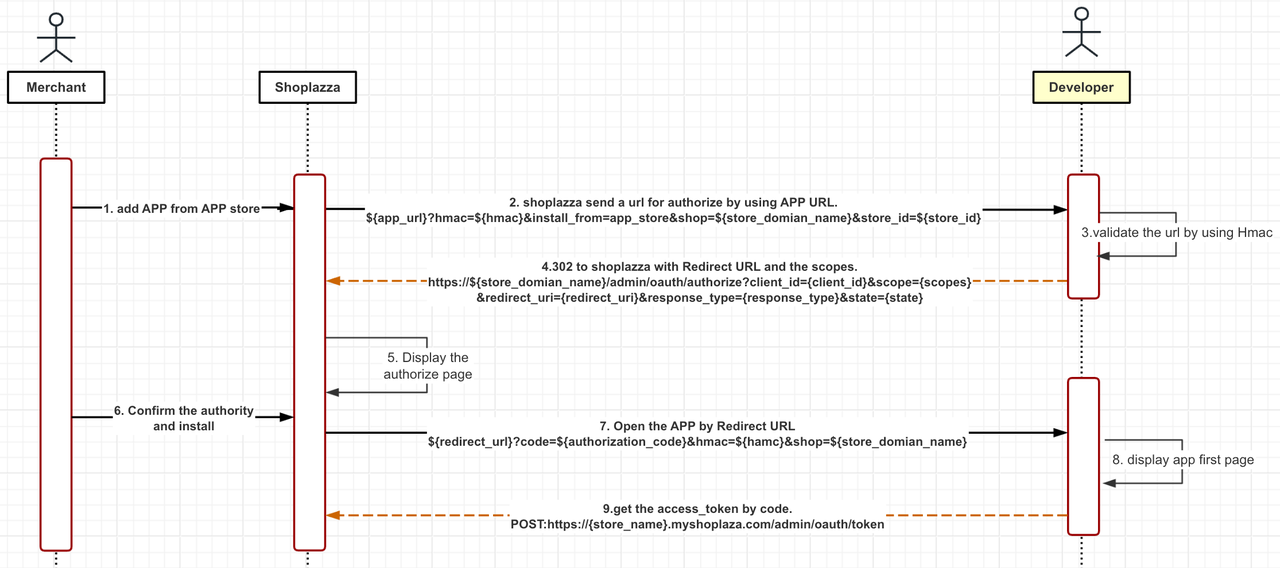
公有应用使用 OAuth 2.0 进行授权,交互流程如下图所示。
您需要重点关注步骤 2、3、4、7、8、9,并在步骤 3、4、9 中编写您的处理逻辑代码。
🚧 authorization_code 只能使用一次。
重要步骤详细说明
步骤 2:Shoplazza 后端通过 APP URL 建立通信和授权。
商家从应用市场添加应用后,Shoplazza 服务将通过合作伙伴中心配置的 APP URL 发送请求。
格式为:
app_url?hmac=${hmac}&install_from=app_store&shop=${store_domian_name}&store_id=${store_id}
步骤 3:应用服务进行安全检查
在继续之前,请确保您的应用执行以下安全检查。如果任何检查失败,您的应用必须以错误拒绝该请求,并且不得继续处理。
- hmac 有效且由 Shoplazza 签名。
- shop 参数是有效的店铺主机名,以 myshoplaza.com 结尾。
对于安全检查,SHOPLAZZA OAuth SDK 也有相应的方法,您可以通过 SHOPLAZZA OAuth SDK 快速验证 hmac 和 shop 参数,例如:OAuth-SDK-Go,示例如下:
import (
  co "github.com/shoplazza-os/oauth-sdk-go"
  "github.com/shoplazza-os/oauth-sdk-go/shoplazza"
)

oauth := &co.Config{
                ClientID:     "s1Ip1WxpoEAHtPPzGiP2rK2Az-P07Nie7V97hRKigl4",
                ClientSecret: "{YOUR_CLIENT_SECRET}",
                Endpoint:     shoplazza.Endpoint,
                RedirectURI:  "https://3830-43-230-206-233.ngrok.io/oauth_sdk/redirect_uri/",
                Scopes:       []string{"read_shop"},
        }
oauth.ValidShop("xxx.myshoplaza.com")        // 验证 shop 参数

var requestUrl = "http://example.com/some/redirect_uri?code={authorization_code}&shop={store_name}.myshoplaza.com&hmac={hmac}"
query := strings.Split(requestUrl, "?")
params, _ := url.ParseQuery(query[1])
oauth.SignatureValid(params)                 // 验证 hmac
HMac 验证详情
Shoplazza 向您应用服务器发出的每个请求或重定向都包含一个 hmac 参数,可用于验证 Shoplazza 的真实性。对于每个请求,您必须从查询字符串中移除 hmac 条目,并通过 HMAC-SHA256 哈希函数对其进行处理。
例如,对于以下请求:
http://example.com/some/redirect/uri?code=1vtke5ljOOL2jPds6gM0TNCeYZDitYB&shop=simon.myshoplaza.com&hmac=22bad22eee1f92836f7773e87d973479
要移除 hmac,您可以将查询字符串转换为 map,移除 hmac 键值对,然后按字典顺序将 map 重新拼接为查询字符串。这将保留示例查询字符串中的其余参数:
code=1vtke5ljOOL2jPds6gM0TNCeYZDitYB&shop=simon.myshoplaza.com
处理哈希函数
移除 hmac 并重新格式化查询字符串后,您可以使用 Shoplazza 提供给您应用的 Client secret 通过 HMAC-SHA256 哈希函数处理该字符串。如果生成的十六进制摘要与 hmac 参数的值相等,则消息通过鉴权。
以下 Ruby 示例展示了如何通过哈希函数处理字符串:
def verified_hmac?(hmac)
  sha256 = OpenSSL::Digest::SHA256.new
  query_string = "code=1vtke5ljOOL2jPds6gM0TNCeYZDitYB&shop=simon.myshoplaza.com"
  calculated_hmac = OpenSSL::HMAC.hexdigest(sha256, CLIENT_SECRET, query_string)
  ActiveSupport::SecurityUtils.secure_compare(calculated_hmac, hmac)
end
使用 Node.js 进行 HMac 验证
本教程将引导您创建一个简单的 Shoplazza OAuth 应用,该应用可获取客户列表。我们还将使用 HMAC(基于哈希的消息鉴权码)验证传入请求,以确保其确实来自 Shoplazza。
前提条件:
- 已安装 Node.js。
- 了解 Express.js 基础知识。
- 拥有 Shoplazza 账号和 ngrok(用于本地开发)。
步骤:
- 搭建基础 Express 应用
安装所需的 npm 包:
npm install express crypto axios
- 初始化 Express 和所需库
const express = require("express");
const crypto = require("crypto");
const axios = require("axios");

const app = express();
- 定义常量
将 CLIENT_ID 和 CLIENT_SECRET 替换为您在 Shoplazza 开发者平台后台获取的值,您需要创建一个公有应用才能获取这两个凭据。BASE_URL 应指向您的服务器 URL。本示例使用 ngrok 将本地 3000 端口转发到公网进行本地开发(详见 https://ngrok.com/),设置 ngrok 隧道后,请将 https://015d-207-81-205-140.ngrok-free.app 替换为 ngrok 为您生成的链接:
const CLIENT_ID = "<YOUR_CLIENT_ID>";
const CLIENT_SECRET = "<YOUR_CLIENT_SECRET>";
const BASE_URL = "https://015d-207-81-205-140.ngrok-free.app";
const REDIRECT_URI = `${BASE_URL}/auth/shoplazza/callback`;
let access_token = {};
- HMAC 验证
secureCompare 函数安全地比较两个字符串以防止时序攻击:
function secureCompare(a, b) {
    return crypto.timingSafeEqual(Buffer.from(a), Buffer.from(b));
}
中间件 hmacValidatorMiddleWare 验证请求中收到的 HMAC,您需要构建用于 HMAC 验证的消息(详见:https://www.shoplazza.dev/reference/oauth#hmac-validation):
function hmacValidatorMiddleWare(req, res, next) {
    const { code, hmac, state, shop } = req.query;
    const map = Object.assign({}, req.query);
    delete map["hmac"];
    const sortedKeys = Object.keys(map).sort();
    const message = sortedKeys.map(key => `${key}=${map[key]}`).join('&');

    const generated_hash = crypto
      .createHmac("sha256", CLIENT_SECRET)
      .update(message)
      .digest("hex");
    if (!secureCompare(generated_hash, hmac)) {
      return res.status(400).send("HMAC validation failed");
    }
    next();
}
- OAuth 流程
访问 /auth/shoplazza 路由时,应用将把用户重定向到 Shoplazza 的 OAuth 页面:
app.get("/auth/shoplazza", (req, res) => {
  const scopes = "read_customer";
  const state = crypto.randomBytes(16).toString("hex");

  res.redirect(
    `https://${req.query.shop}/admin/oauth/authorize?client_id=${CLIENT_ID}&scope=${scopes}&redirect_uri=${REDIRECT_URI}&response_type=code&state=${state}`
  );
});
授权后,Shoplazza 将重定向到 /auth/shoplazza/callback 路由:
app.get("/auth/shoplazza/callback", hmacValidatorMiddleWare, async (req, res) => {
    const { code, hmac, state, shop } = req.query;

    if (shop && hmac && code) {
        const { data } = await axios.post(`https://${shop}/admin/oauth/token`, {
            client_id: CLIENT_ID,
            client_secret: CLIENT_SECRET,
            code,
            grant_type: "authorization_code",
            redirect_uri: REDIRECT_URI,
        });
        access_token[shop] = data.access_token;

        const result = await axios({
            method: "get",
            url: `https://${shop}/openapi/2022-01/customers`,
            headers: {
               "Access-Token": access_token,
            },
        });
        res.status(200).send(result.data ? result.data : "No customer found");
    } else {
        res.status(400).send("Required parameters missing");
    }
});
附注:在本示例中,以下是如何在开发者中心填写 URL 的说明。当然,您生成的 ngrok 链接与以下示例不同,请记得将 ngrok 链接更新为您自己的。
- 启动服务器
最后,在 3000 端口启动 Express 服务器
app.listen(3000, () => console.log("Server is listening on port 3000"));
Webhook HMAC 验证
OAuth 的 HMAC 验证流程与验证 webhooks 的流程不同。
Webhooks 可通过计算数字签名进行验证。每个 webhook 请求都包含一个 Base64 编码的 X-Shoplazza-Hmac-Sha256 header,该 header 使用应用的 Client Secret 和请求中发送的数据生成。
要验证请求是否来自 Shoplazza,请按以下算法计算 HMAC 摘要,并与 X-Shoplazza-Hmac-Sha256 header 中的值进行比较。如果匹配,则可以确认 webhook 是由 Shoplazza 发送的。最佳实践是在应用响应 webhook 之前先验证 HMAC 摘要。
以下示例使用 Ruby 和 Sinatra 验证 webhook 请求:
require 'rubygems'
require 'base64'
require 'openssl'
require 'sinatra'

# Shoplazza 的 Client Secret
SECRET = 'my_secret'

helpers do
  # 基于共享密钥和请求内容计算 HMAC 摘要,并与 header 中上报的 HMAC 进行比较
  def verify_webhook(data, hmac_header)
    calculated_hmac = Base64.strict_encode64(OpenSSL::HMAC.digest('sha256', SECRET, data))
    ActiveSupport::SecurityUtils.secure_compare(calculated_hmac, hmac_header)
  end
end

# 响应 HTTP POST 请求
post '/' do
  request.body.rewind
  data = request.body.read
  verified = verify_webhook(data, env["X-Shoplazza-Hmac-Sha256"])

  puts "Webhook verified: #{verified}"
end
步骤 4:传递访问权限(Scopes)以获取所需 API 的访问权限。
应用服务收到该授权请求后,如果授权无误,将使用 302 方式进行重定向。
例如:
https://rwerwre.myshoplaza.com/admin/oauth/authorize?client_id=ZwwR8eXIOq0Rr2XN3zUywxc0q-S9C3w4VkH3HnNUL_Q&redirect_uri=https%3A%2F%2Fstamped-review.apps.shoplazza.com%2Fapi%2Fauth%2Fcallback&response_type=code&scope=read_product+read_order+read_collection+read_shop+read_script_tags+write_script_tags+read_customer+read_price_rules+read_comments
格式:
https://${store_domian_name}/admin/oauth/authorize?client_id={client_id}&scope={scopes}&redirect_uri={redirect_uri}&response_type={response_type}&state={state}
- store_domian_name:${store_name}.myshoplaza.com
- store_name:商家店铺名称。
- client_id:应用的 Client ID,可在注册应用后于 https://partners.shoplazza.com/ 获取。
- scope:以空格分隔的 [scopes] 列表
- redirect_uri:商家授权应用后被重定向到的 URL。
- response_type:OAuth 2.0 流程的 response type,此处填写 code
- state:随机值,用于防止 CSRF 攻击。
访问权限(Scopes)
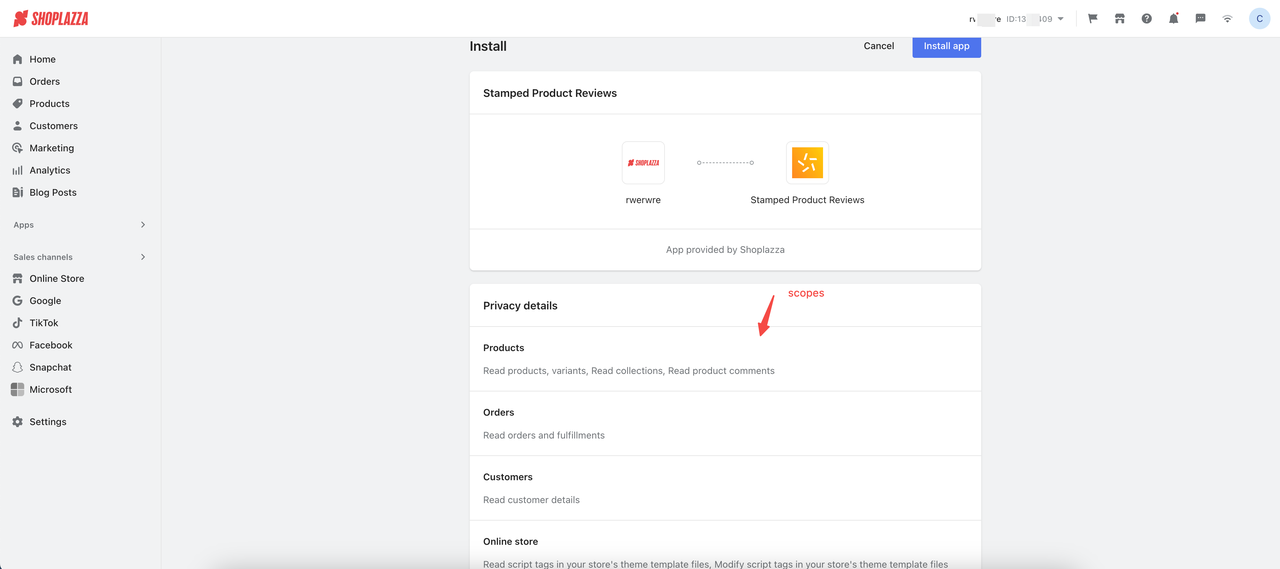
Scope 代表公有应用需要申请的权限,不同权限允许访问不同的 API。scope 的值由开发者选择并组装到上述 302 重定向 URL 中。在商家应用安装确认页面,商家将被要求进行授权,如下图所示:
API 与 Scope 值的映射关系
与 API 访问路径的映射关系如下:查看详情
| API 访问 URL | scope |
|---|---|
| /openapi/{verison}/shop | shop(read_shop write_shop) |
| /openapi/{verison}/themes | themes(read_themes write_themes) |
| /openapi/{verison}/pages | shop_navigation(read_shop_navigation write_shop_navigation) |
| /openapi/{verison}/redirects | shop_navigation(read_shop_navigation write_shop_navigation) |
| /openapi/{verison}/products | product(read_product write_product) |
| /openapi/{verison}/products/{productId}/variants | product(read_product write_product) |
| /openapi/{verison}/collections | collection(read_collection write_collection) |
| /openapi/{verison}/collects | collection(read_collection write_collection) |
| /openapi/{verison}/comments | comments(read_comments write_comments) |
| /openapi/{verison}/payments_apps | payment_info(read_payment_info write_payment_info) |
| /openapi/{verison}/orders | order(read_order write_order) |
| /openapi/{verison}/customers | customer(read_customer write_customer) |
| /openapi/{verison}/price_rules | price_rules(read_price_rules write_price_rules) |
| /openapi/{verison}/price_rules/{priceRuleId}/discount_codes | price_rules(read_price_rules write_price_rules) |
| /openapi/{verison}/coupons | price_rules(read_price_rules write_price_rules) |
| /openapi/{verison}/discount_flashsales | price_rules(read_price_rules write_price_rules) |
| /openapi/{verison}/discount_rebates | price_rules(read_price_rules write_price_rules) |
| /openapi/{verison}/popups | price_rules(read_price_rules write_price_rules) |
| /openapi/{verison}/salespops | price_rules(read_price_rules write_price_rules) |
| /openapi/{verison}/gift_cards | gift_cards(read_gift_cards write_gift_cards) |
| /openapi/{verison}/app-proxies | app_proxy(read_app_proxy write_app_proxy) |
| /openapi/{verison}/data | data(read_data write_data) |
| /openapi/{verison}/script_tags_new | script_tags(read_script_tags write_script_tags) |
| /openapi/2024-07/shoplazza-payment | finance(read_finance write_finance) |
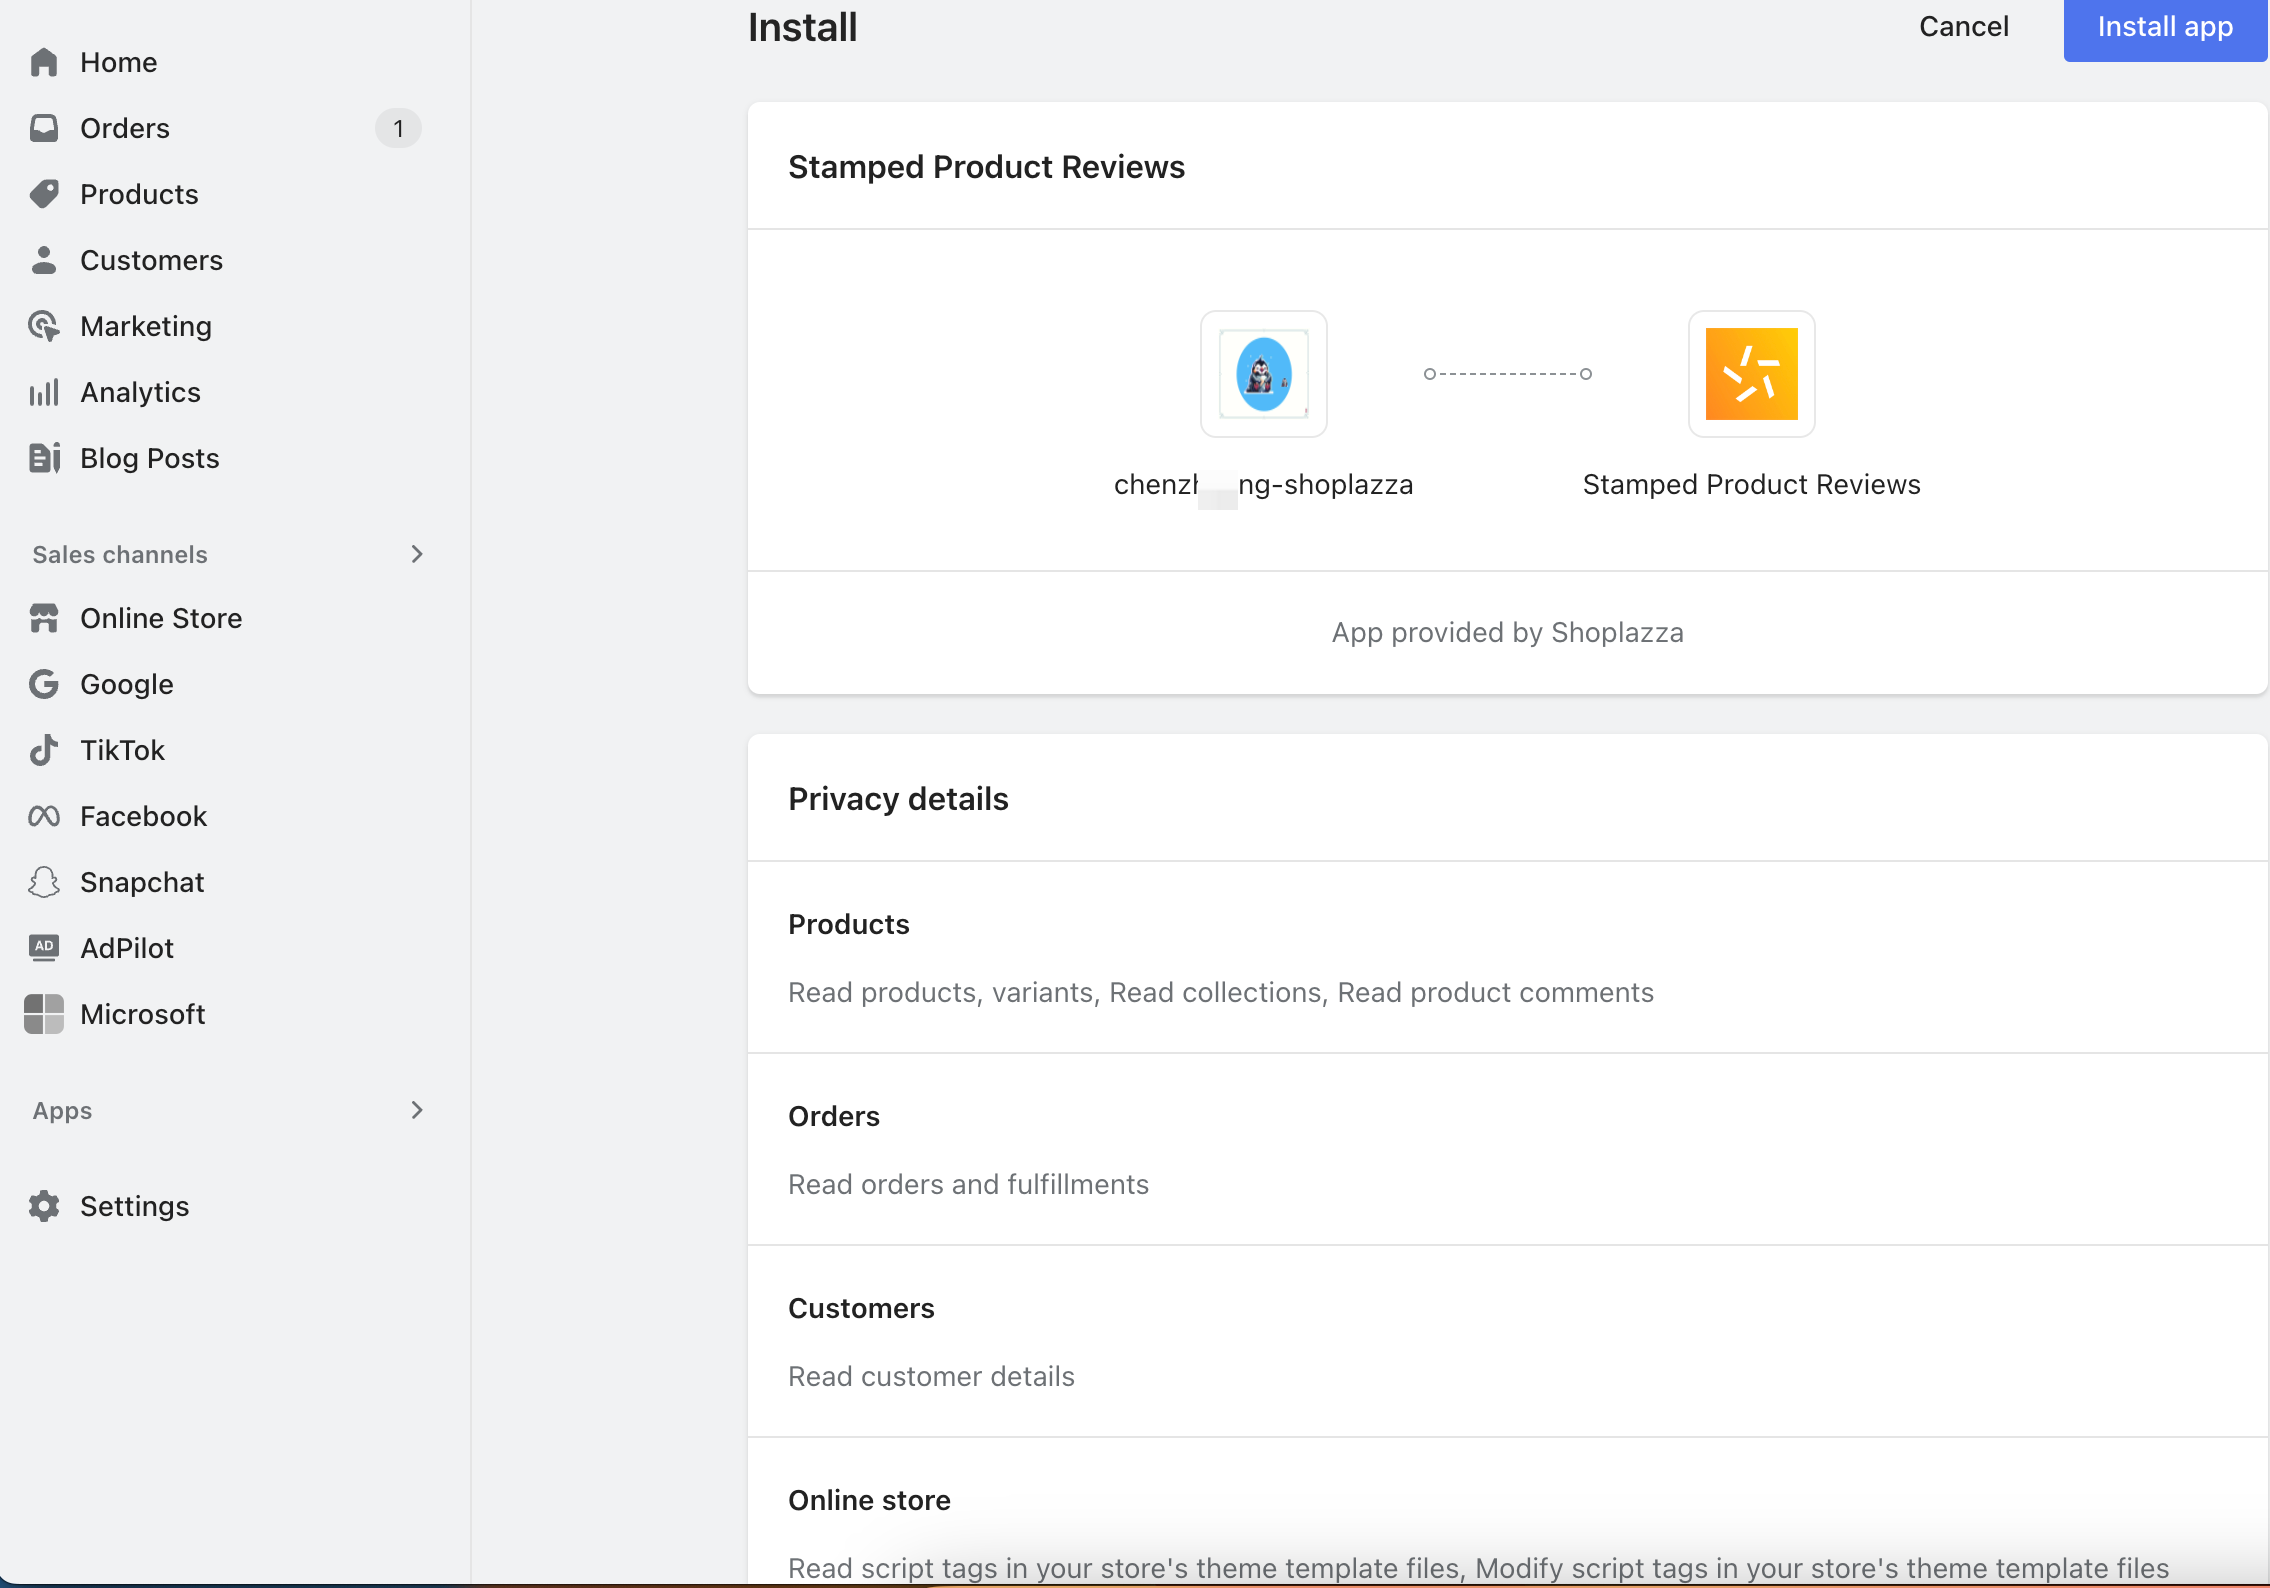
步骤 5:显示授权页面
应用通过 scope 参数申请访问店铺相关数据,需要店铺所有者的授权确认。授权页面如下所示。
步骤 6:通过 Redirect URL 打开应用
商家点击"安装应用"后
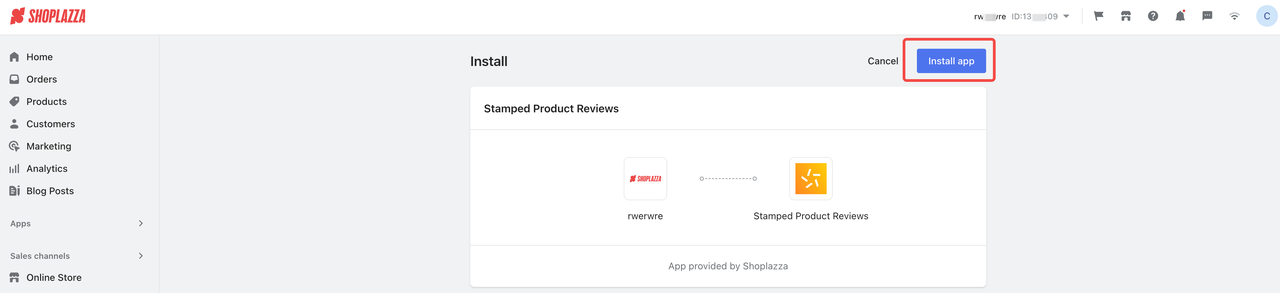
Shoplazza 服务将通过 redirect URL 打开应用。
例如:
https://stamped-review.apps.shoplazza.com/api/auth/callback?code=wBe-NWHzW21e94YqD4bRKBsJsE2GcZlDzP4oW9w2ddk&hmac=4c396fac1912057b65228f5bbd4a65255961d85a60fba1f1105ddbf27f17b58f&shop=rwerwre.myshoplaza.com
格式:
{redirect_url}?code=${authorization_code}&hmac=${hamc}&shop=${store_domian_name}
步骤 7:通过 Code 获取 Access_token
您可以通过以下请求获取 Access token:
POST https://{store_name}.myshoplaza.com/admin/oauth/token
在此请求中,store_name 是商家店铺名称,并附带以下参数:
- client_id:应用的 Client ID。
- client_secret:应用的 Client secret 密钥。
- code:重定向中提供的 authorization_code。
- grant_type:OAuth 2.0 流程的 grant type,此处填写 authorization_code。
- redirect_uri:应用的 redirect_uri。
服务器响应并返回 access token:
{
  "token_type": "Bearer",
  "expires_at": 1550546245,
  "access_token": "{YOUR_ACCESS_TOKEN}",
  "refresh_token": "{YOUR_REFRESH_TOKEN}",
  "store_id": "2",
  "store_name": "xiong1889"
}
- token_type:固定返回 Bearer。
- expires_at:access_token 的过期时间,为时间戳格式。
- access_token:正确的 access_token。
- refresh_token:用于在需要时刷新 access_token 的 refresh token。
- store_id:店铺在 Shoplazza 中的 ID
- store_name:店铺名称
OAuth SDK 可用!
同样,您也可以通过 SHOPLAZZA OAuth SDK 快速获取 access token,例如:Oauth-SDK-Go,示例如下:
import (
  co "github.com/shoplazza-os/oauth-sdk-go"
  "github.com/shoplazza-os/oauth-sdk-go/shoplazza"
)

oauth := &co.Config{
                ClientID:     "s1Ip1WxpoEAHtPPzGiP2rK2Az-P07Nie7V97hRKigl4",
                ClientSecret: "{YOUR_CLIENT_SECRET}",
                Endpoint:     shoplazza.Endpoint,
                RedirectURI:  "https://3830-43-230-206-233.ngrok.io/oauth_sdk/redirect_uri/",
                Scopes:       []string{"read_shop"},
        }
token, err := oauth.Exchange(context.Background(),"xxx.myshoplaza.com", "code"))
如果 token 过期,您可以通过以下请求刷新 access_token:
POST https://{store_name}.myshoplaza.com/admin/oauth/token
此请求需要以下参数:
- client_id:Shoplazza 提供的 Client ID。
- client_secret:Shoplazza 提供的 Client secret 密钥。
- refresh_token:上述提到的 refresh_token。
- grant_type:OAuth 2.0 流程的 grant type,此处填写 refresh_token。
- redirect_uri:应用的 redirect_uri。
服务器响应并返回 access token:
{
  "token_type": "Bearer",
  "expires_at": 1550546245,
  "access_token": "{YOUR_ACCESS_TOKEN}",
  "refresh_token": "{YOUR_REFRESH_TOKEN}",
  "store_id": "2",
  "store_name": "xiong1889"
}
OAuth SDK 可用!
同样,您也可以通过 SHOPLAZZA OAuth SDK 快速刷新 access token,例如:Oauth-SDK-Go,示例如下:
import (
  co "github.com/shoplazza-os/oauth-sdk-go"
  "github.com/shoplazza-os/oauth-sdk-go/shoplazza"
)

oauth := &co.Config{
                ClientID:     "s1Ip1WxpoEAHtPPzGiP2rK2Az-P07Nie7V97hRKigl4",
                ClientSecret: "{YOUR_CLIENT_SECRET}",
                Endpoint:     shoplazza.Endpoint,
                RedirectURI:  "https://3830-43-230-206-233.ngrok.io/oauth_sdk/redirect_uri/",
                Scopes:       []string{"read_shop"},
        }
token, err := oauth.RefreshToken(context.Background(), "xxx.myshoplaza.com", "refresh token")
使用 Shoplazza API 开发所有功能
应用获取 API access_token 后,即可向 Admin API 发送鉴权请求。
这些请求附带 header Access-Token: {access_token},其中 {access_token} 替换为永久 token。
以下请求展示了如何使用 Admin API 获取商品列表
curl -i -X GET \
     -H "Content-Type:application/json" \
     -H "Access-Token:{YOUR_ACCESS_TOKEN}" \
     'https://store.myshoplaza.com/openapi/2020-01/products'